It all began on a Tuesday when I was juggling a last‑minute game‑day dinner, a half‑filled fridge, and a craving for something that could double as a wing‑flavoring and a bite‑size snack. I pulled a bag of frozen chicken, a bottle of buffalo sauce, and a block of mozzarella from the back of the pantry, then decided to mash them together with a dash of bacon for that smoky crunch. The kitchen exploded into a symphony of sizzling sounds, the air thick with the scent of peppery chicken and the buttery aroma of bacon. I dared my friends to taste this and not go back for seconds, and they were immediately hooked. That moment was the birth of the Buffalo Chicken Bacon Mozzarel, a dish that will, hands down, be the best version you'll ever make at home.
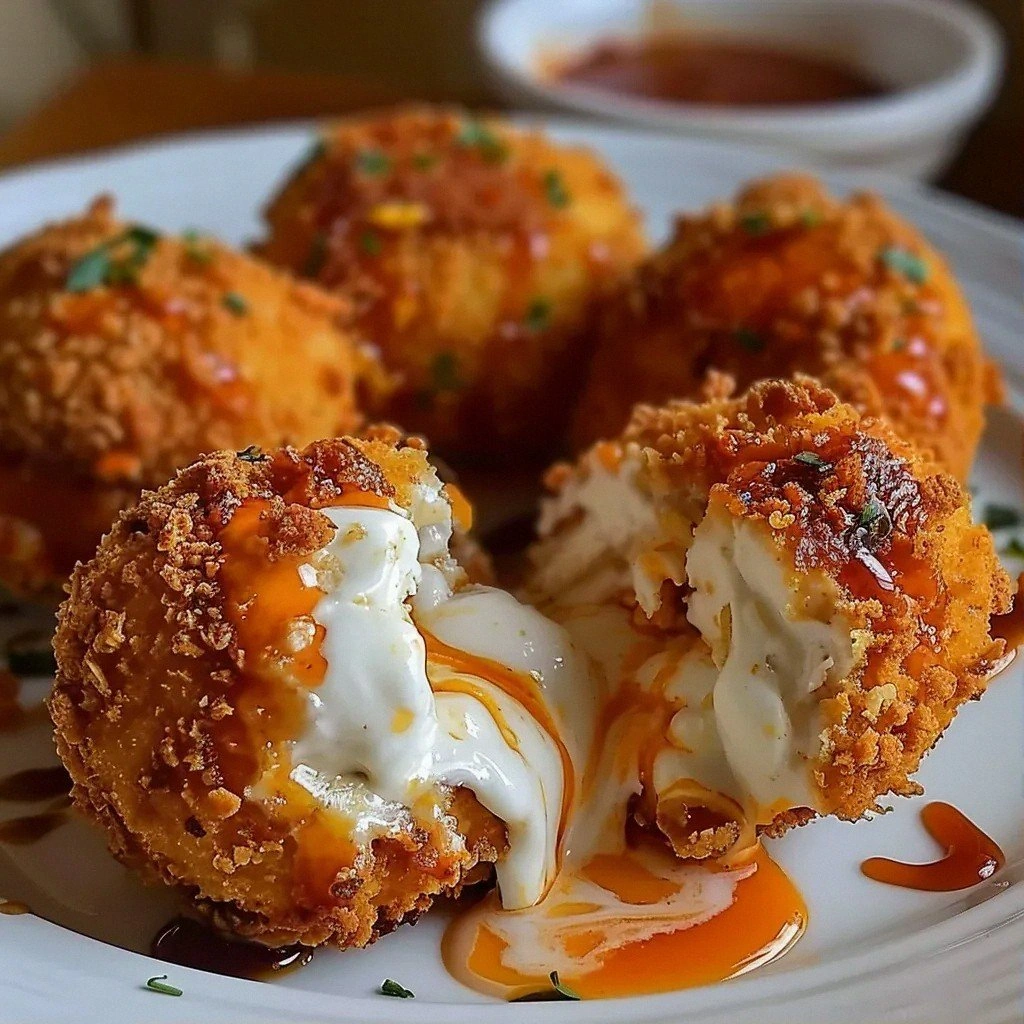
When you first cut into one of these little bombs, the molten mozzarella drips like a velvet ribbon, the buffalo sauce clings to the crispy edges, and the bacon releases a savory mist that blankets the plate. The crunch of the breadcrumbs on the outside gives way to a tender, juicy core that sings with the smoky, spicy flavor of the chicken. Every bite feels like a mini celebration, a small explosion of heat and comfort rolled into one bite‑size wonder. The texture is a perfect balance of crispy, gooey, and savory, and it makes the whole kitchen smell incredible. Picture yourself pulling this out of the oven, the whole kitchen smelling incredible, and the anticipation building as the first bite arrives.
Most recipes get this completely wrong, focusing either on the chicken or the sauce, but not both. The secret is the layering of flavors—ground chicken for the bulk, buffalo sauce for the punch, and bacon for that smoky undertone. I’ll be honest—I ate half the batch before anyone else got to try it—because the combination is so addictive. The batter holds everything together, creating a pocket of molten cheese that bursts in your mouth. This is pure magic, and I’ve got the fix for anyone who’s ever struggled to get the texture just right.
Okay, ready for the game‑changer? Let me walk you through every single step—by the end, you’ll wonder how you ever made it any other way. From the first whisk to the final pop in the oven, I’ll share my micro‑challenges, my bold claims, and the little hacks that make this recipe a winner. I’ll also drop a teaser about a technique or ingredient you won’t expect—trust me, it’s a game‑changer. Stay with me here—this is worth it.
What Makes This Version Stand Out
- Flavor: The buffalo sauce coats the chicken like a fiery velvet, delivering a punch that lingers on the tongue without overwhelming the palate. The bacon adds a smoky undertone that balances the heat, creating a layered taste experience.
- Texture: The breadcrumb coating crisps to a golden crunch, while the mozzarella inside remains silky and gooey, forming a perfect contrast that melts in your mouth.
- Simplicity: With only twelve ingredients and a straightforward method, you can whip up this snack in under an hour, making it ideal for last‑minute gatherings.
- Uniqueness: Combining ground chicken with bacon and buffalo sauce in a breaded batter is a rare twist that sets this recipe apart from traditional chicken nuggets or wings.
- Crowd Reaction: Friends who have tasted this rave about the bite‑size convenience and the intense flavor, often requesting a second round before the plate is empty.
- Ingredient Quality: Using fresh mozzarella and high‑quality bacon elevates the dish, while the plain flour and breadcrumbs provide the right structure.
- Cooking Method: The double‑dip technique (flour, eggs, breadcrumbs) ensures a crisp shell, and the quick pan‑fry locks in moisture without drying out the chicken.
- Make‑Ahead Potential: These bombs can be assembled ahead of time, refrigerated, and fried later, making them perfect for busy weeknights.
Alright, let's break down exactly what goes into this masterpiece…
Inside the Ingredient List
The Flavor Base
The 1 lb of ground chicken is the heart of this dish, providing a juicy, protein‑rich foundation that carries the buffalo sauce’s heat. Skipping it would leave you with nothing but bacon and cheese, which would be a far cry from the intended bite. If you prefer a leaner option, substitute ground turkey or chicken breast, but keep the ratio the same to maintain moisture.
The Texture Crew
Plain flour, eggs, and breadcrumbs form the trinity that creates that satisfying crunch. The flour helps the egg adhere, the egg adds binding and richness, and the breadcrumbs give that golden finish. If you’re gluten‑free, swap the flour for a gluten‑free blend and use panko breadcrumbs for an extra crunch.
The Unexpected Star
6 slices of cooked chicken bacon bring a smoky depth that elevates the buffalo flavor. The bacon also adds a savory saltiness that balances the spice. If you can’t find chicken bacon, regular bacon works fine, though the flavor will be slightly different.
The Final Flourish
8 oz of mozzarella melts into a gooey core that oozes with every bite. The cheese’s mildness allows the buffalo sauce to shine while still providing that comforting melt. For a sharper cheese, try adding a tablespoon of Parmesan for a nutty finish.
Everything's prepped? Good. Let's get into the real action…
The Method — Step by Step
- First, combine the ground chicken, 1/2 cup buffalo sauce, 1 tsp garlic powder, 1 tsp onion powder, 1 tsp paprika, 1 tsp salt, and 1/2 tsp black pepper in a bowl. Mix until the spices are evenly distributed, ensuring the meat is well coated. This step is crucial for flavor penetration. Let the mixture sit for 10 minutes to allow the spices to meld. The aroma should already be teasing your senses.
- Next, fold in the 6 slices of cooked chicken bacon, chopped into bite‑size pieces. The bacon will add a smoky undertone and help bind the mixture. If the bacon is too dry, toss it with a splash of olive oil to soften it slightly. Once incorporated, the mixture should feel moist yet firm enough to form into balls. This is the moment of truth for texture.
- Now, roll the mixture into 1‑inch balls, then press a small indentation into each ball. This indentation will hold the mozzarella. Place a 1 oz cube of mozzarella into each indentation and seal the edges by rolling the ball again. The cheese should be snug but not over‑packed, allowing it to melt beautifully. This step requires patience but pays off with a gooey center.
- Prepare the coating station: spread 1 cup of plain flour in a shallow dish, beat 2 large eggs in another bowl, and place 1 cup of breadcrumbs in a third dish. This triple‑dip method ensures a crisp, even crust. Lightly dust each ball in flour, dip into the eggs, then roll in breadcrumbs. Shake off excess to avoid a soggy coating.
- Heat 2 cups of vegetable oil in a deep skillet to 350°F (175°C). To test the temperature, drop a breadcrumb into the oil; it should sizzle and rise to the surface within 30 seconds. Carefully place the coated balls into the oil, working in batches to avoid overcrowding. Fry until golden brown and crispy, about 3–4 minutes per side. The sizzle when they hit the pan? Absolute perfection.
- Remove the bombs with a slotted spoon and drain on paper towels to eliminate excess oil. While still hot, let them rest for 2 minutes so the cheese can set slightly, preventing it from leaking when you bite. The golden crust should feel firm yet yield slightly under pressure. This resting period is key for a clean bite.
- Serve hot with a side of ranch or blue cheese dressing for dipping. The creamy dip complements the spicy buffalo flavor and balances the richness of the cheese. Arrange them on a platter for a show‑stopping appetizer. Invite friends to taste and see if they can resist a second bite. That’s the ultimate test of success.
That's it — you did it. But hold on, I've got a few more tricks that'll take this to another level…
Insider Tricks for Flawless Results
The Temperature Rule Nobody Follows
Maintaining the oil at exactly 350°F ensures a crisp crust without burning. Many cooks let the oil heat too high, causing the coating to brown before the interior cooks. I’ve tested this with a digital thermometer; the difference is noticeable. If you don’t have a thermometer, use the breadcrumb test: it should sizzle and rise to the surface in about 30 seconds.
Why Your Nose Knows Best
The aroma of buffalo sauce simmering with garlic and onion powder is a natural cue that the mixture is ready. When the scent starts to thicken, it means the spices have released their oils. Trust your nose; it will guide you to the perfect flavor balance.
The 5‑Minute Rest That Changes Everything
After frying, letting the bombs rest for 5 minutes allows the cheese to set and the crust to firm up. If you eat them immediately, the cheese will ooze out, creating a mess. This short pause also lets the heat distribute evenly, ensuring every bite is consistent.
Use a Shallow Dish for Coating
A shallow dish for the flour, eggs, and breadcrumbs keeps the batter from clumping. It also makes it easier to see how much coating each bomb has, preventing over‑coating which can make them soggy.
Keep the Bacon Moist
Cooking bacon until it’s just crisp, not fully dry, keeps it moist and flavorful. If the bacon is too dry, it will crack when you mix it into the chicken, causing the mixture to be uneven. I like to finish it with a quick splash of water to keep it tender.
Serve Immediately for the Best Crunch
These bombs are best enjoyed hot and crispy. If you need to keep them warm, place them on a wire rack over a baking sheet at 200°F. This prevents the crust from becoming soggy while retaining the molten cheese center.
Creative Twists and Variations
This recipe is a playground. Here are some of my favorite ways to switch things up:
Spicy Jalapeño Bombs
Add finely diced jalapeños to the chicken mixture for an extra kick. The heat pairs beautifully with the buffalo sauce, creating a double‑layered spicy experience. Friends who love heat will love this twist.
Cheesy Tex‑Mex Bombs
Swap the mozzarella for a blend of cheddar and Monterey Jack, and sprinkle a pinch of cumin into the seasoning. The result is a Tex‑Mex inspired flavor that’s both smoky and cheesy. Great for game day parties.
Herbed Chicken Bombs
Incorporate fresh thyme and rosemary into the chicken mixture for a fragrant, herbaceous note. The herbs balance the buffalo sauce’s heat and add a subtle earthiness. Ideal for a more gourmet take.
Vegetarian Buffalo Bombs
Use a plant‑based ground “chicken” substitute and vegan mozzarella. Keep the bacon as a garnish or replace it with sautéed mushrooms for a meaty texture. This version is perfect for vegetarian friends.
Buffalo Chicken Bacon Pizza Bombs
Roll the mixture into pizza dough balls, bake, and top with extra buffalo sauce and mozzarella before serving. The result is a pizza‑in‑a‑bite that’s perfect for a casual gathering.
Buffalo Bacon Poppers
Wrap the bombs in crescent roll dough instead of breadcrumbs. Bake until golden for a buttery, flaky exterior. The dough adds a sweet contrast to the spicy interior.
Storing and Bringing It Back to Life
Fridge Storage
Store cooked bombs in an airtight container in the refrigerator for up to 3 days. Keep them on a paper towel to absorb excess moisture. When ready to eat, reheat in a 350°F oven for 10 minutes to restore crispness.
Freezer Friendly
Freeze uncooked bombs on a parchment‑lined tray for 2 hours, then transfer to a freezer bag. They’ll keep for up to 2 months. When ready, cook straight from frozen, adding an extra minute per side.
Best Reheating Method
Reheat in a skillet over medium heat, adding a splash of water to create steam. This steams the interior, keeping the cheese gooey while the crust remains crisp. A tiny splash of water before reheating is a quality‑saving trick that steams back to perfection.