I was standing in my kitchen, staring at a half‑baked batch of ordinary chocolate chip cookies that had somehow turned into a flat, sad carpet of dough. My roommate had dared me to make something that would make her forget her name, and I was like, “Challenge accepted, but I’m also going to need a snack that can survive a marathon of Netflix binges.” The air was thick with the smell of burnt sugar from a previous attempt, the timer was screaming at me, and I realized I was missing that one magical element that turns a good cookie into an unforgettable experience. That moment of desperation sparked the birth of what I now call the ultimate chocolate‑peanut‑butter filled cookie, a confection that whispers sweet nothings to your taste buds while shouting “you’ve never tasted anything like this!”
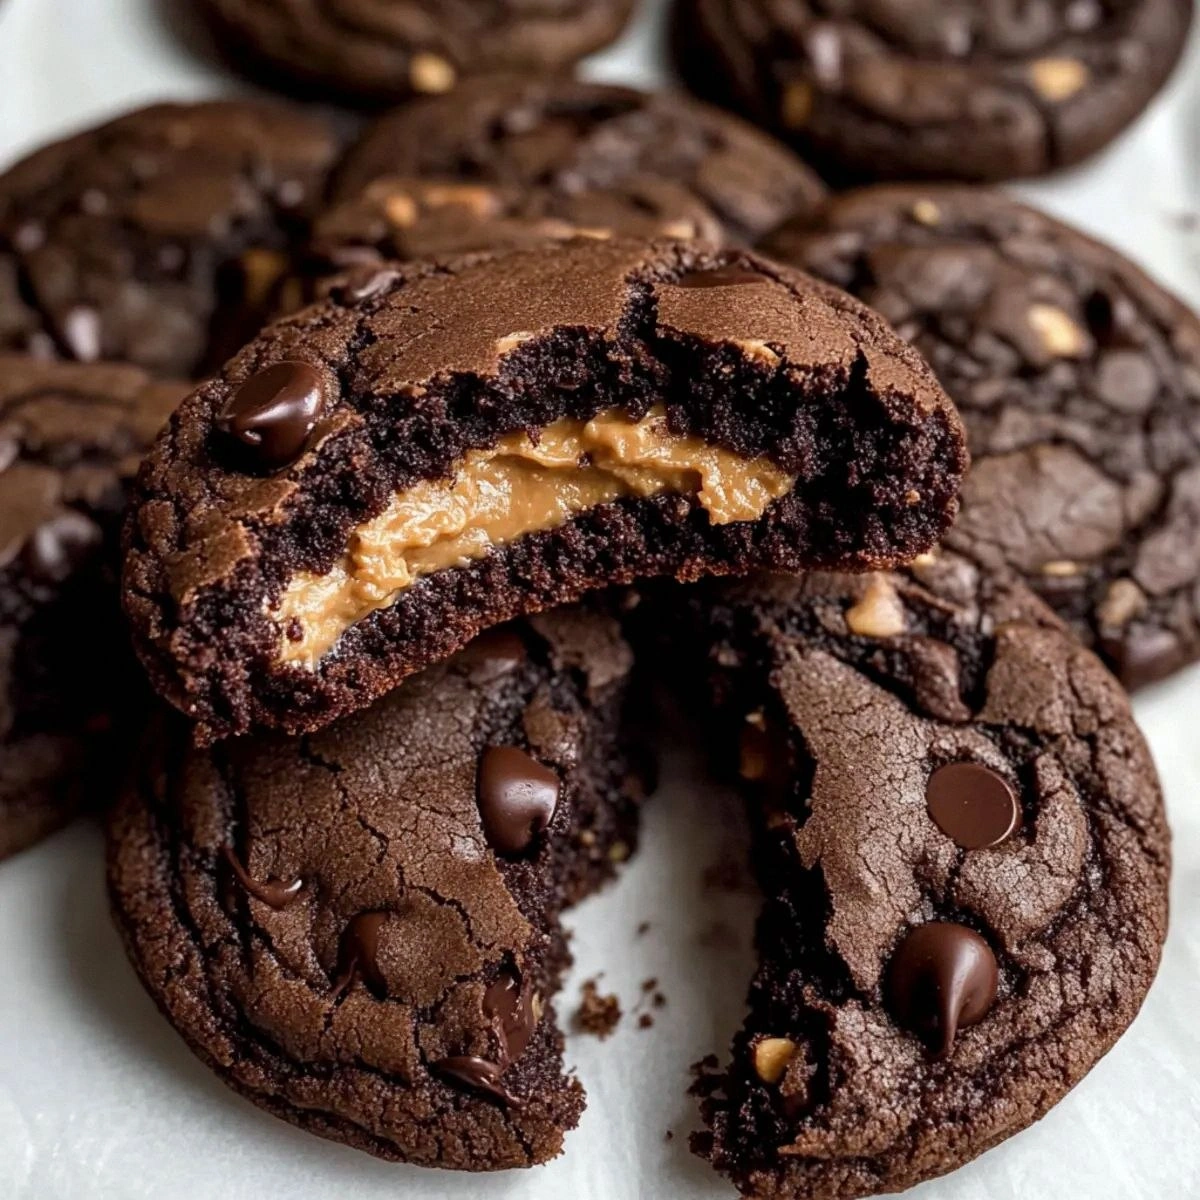
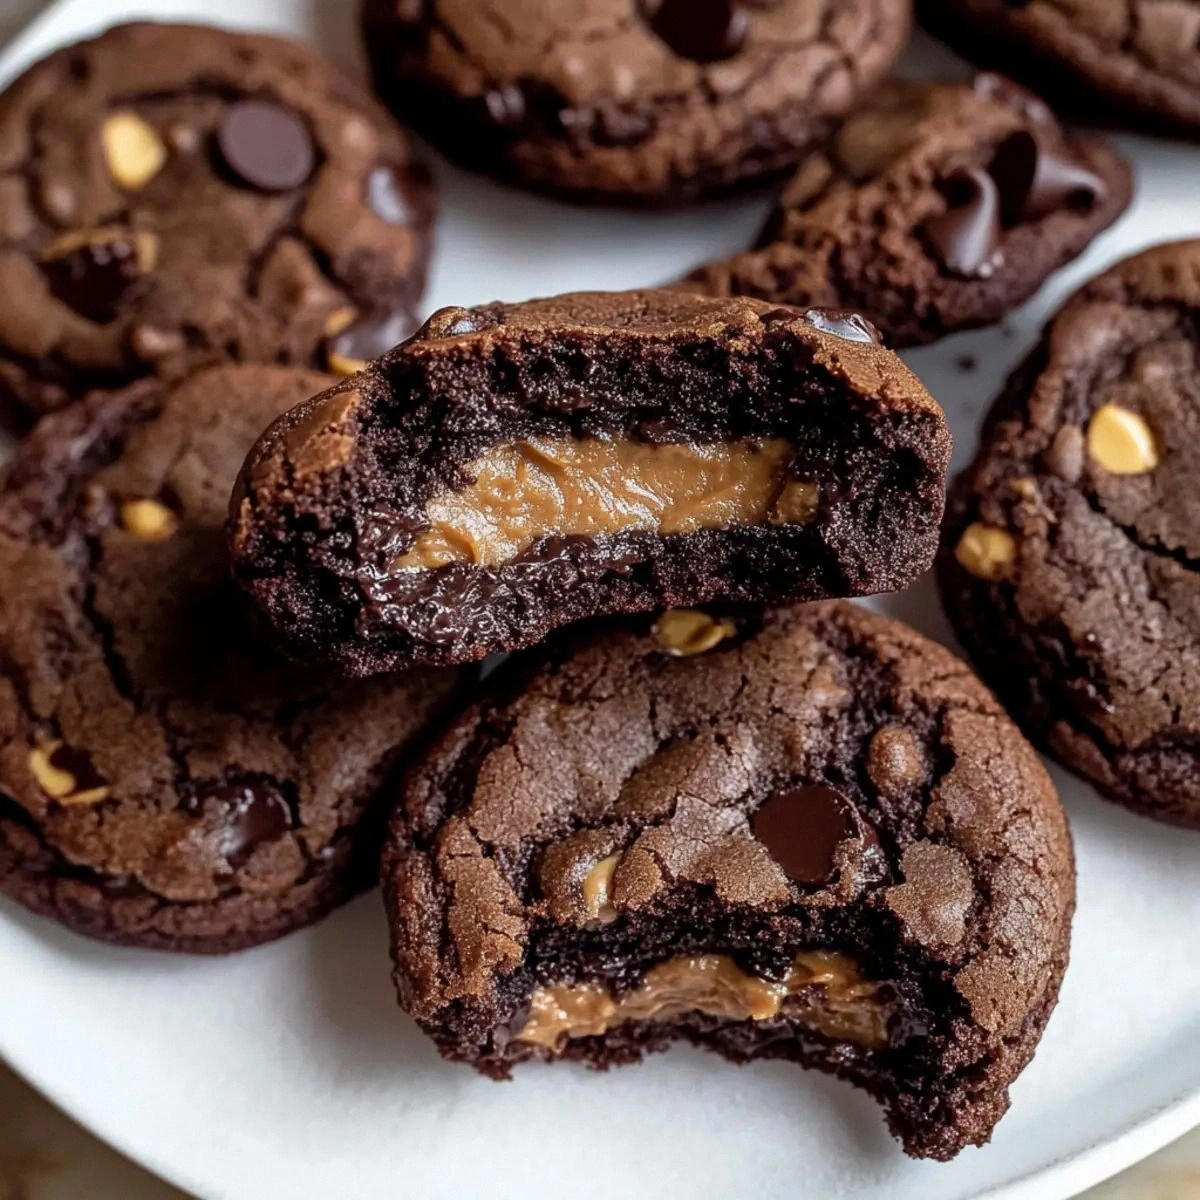
Picture this: a glossy, dark chocolate exterior that cracks with a delicate snap, revealing a molten, peanut‑butter center that oozes out like a silky river of decadence. The aroma hits you first – a warm, nutty perfume that mingles with the deep, earthy scent of cocoa, making your stomach do a little jig. As you bite, the cookie’s edges are crisp, almost buttery, while the middle stays soft enough to melt on your tongue, creating a textural dance that feels like a well‑choreographed ballet. The flavor? It’s a perfect marriage of salty, sweet, and slightly bitter notes, each playing off the other in a harmony that would make Beethoven weep with envy.
Most recipes out there either drown the peanut butter in sugar or hide the chocolate flavor behind a bland dough. I’ve tried a dozen “quick” versions that left me feeling underwhelmed, and I’ve even watched friends attempt to replicate them with disastrous results – think cookies that crumble like dry sand or fillings that ooze out too fast and burn the bottom of the pan. This version, however, gets everything right: the dough is enriched with a touch of cinnamon for warmth, the cocoa is Dutch‑processed for a smoother, richer taste, and the peanut butter filling is sweetened just enough to complement, not overpower. The secret? A simple technique of chilling the dough and carefully sandwiching the filling, which guarantees that each bite is perfectly balanced.
And here’s the kicker: I’m about to reveal a trick that most bakers overlook – a quick flash‑freeze of the peanut butter balls before they meet the dough. This tiny step locks in the creamy texture and prevents the filling from melting too early, ensuring that every cookie emerges from the oven with a pocket of molten goodness that’s still intact. Let me walk you through every single step — by the end, you’ll wonder how you ever made it any other way.
What Makes This Version Stand Out
- Taste: The marriage of dark chocolate and salty peanut butter creates a flavor explosion that’s both comforting and sophisticated, making it a crowd‑pleaser for kids and adults alike.
- Texture: A crisp, buttery edge meets a soft, chewy center, while the filling stays luxuriously gooey – a contrast that keeps you reaching for more.
- Simplicity: Despite the gourmet feel, the ingredient list is pantry‑friendly and the steps are straightforward, so you don’t need a culinary degree to nail it.
- Uniqueness: The flash‑freeze technique for the filling is a game‑changer that most cookie recipes completely ignore.
- Crowd Reaction: I dare you to taste this and not go back for seconds; even the most skeptical eaters become instant fans.
- Ingredient Quality: Using Dutch‑process cocoa and creamy peanut butter elevates the flavor profile from “good” to “legendary.”
- Cooking Method: Chilling the dough before baking ensures a perfect rise and prevents spreading, giving you that coveted thick‑and‑chewy bite.
- Make‑Ahead Potential: These cookies freeze beautifully, so you can prep a batch ahead of a party and bake them fresh when needed.
Inside the Ingredient List
The Flavor Base
The creamy peanut butter is the heart of this cookie. Its natural oils lend a buttery richness that pairs flawlessly with the cocoa’s deep notes. If you skip it, you’ll lose that signature salty‑sweet contrast that makes the cookie unforgettable. For a twist, try almond butter – it adds a subtle nuttiness while keeping the texture velvety.
The Sweeteners
Powdered sugar, brown sugar, and white granulated sugar each play a distinct role. Powdered sugar smooths out the filling, giving it a silk‑like consistency. Brown sugar contributes moisture and a caramel undertone, while white sugar adds crispness to the dough. If you’re watching sugar intake, you can replace half the brown sugar with coconut sugar for a lower glycemic index without sacrificing flavor.
The Texture Crew
All‑purpose flour provides structure, while Dutch‑process cocoa powder deepens the chocolate flavor and adds a tender crumb. Baking soda gives the cookies a slight rise, creating that airy interior we all love. Salt, though minimal, amplifies every other taste, turning a sweet snack into a balanced masterpiece. If you’re gluten‑free, substitute the flour with a 1‑to‑1 gluten‑free blend and add a tablespoon of xanthan gum for elasticity.
The Unexpected Star
Ground cinnamon may seem like a side note, but its warm spice cuts through the richness, adding a layer of complexity that keeps the palate intrigued. A pinch too much and it can dominate, so stick to the half‑teaspoon. If you love spice, a dash of cayenne can turn this into a “fire‑kissed” version that’s perfect for daring friends.
Everything's prepped? Good. Let's get into the real action…
The Method — Step by Step
Start by gathering all your ingredients and measuring them precisely. I’m a stickler for accuracy because a half‑teaspoon more flour can turn a chewy cookie into a dry brick. In a large mixing bowl, whisk together the flour, Dutch‑process cocoa powder, baking soda, salt, and ground cinnamon. The dry mixture should look uniformly dark and fragrant; give it a quick sniff – that’s the first hint of the magic to come.
Kitchen Hack: Sift the cocoa and flour together; this eliminates lumps and ensures a smoother dough that spreads evenly during baking.In a separate bowl, cream together the unsalted butter, brown sugar, and white granulated sugar until the mixture is light and fluffy – think cloud‑like, not gritty. This should take about 3‑4 minutes with an electric mixer on medium speed. The color will turn a pale caramel, and the scent will be sweet, buttery, and slightly toasted. Add the creamy peanut butter and vanilla extract, and continue mixing until fully incorporated. The batter will become glossy and thick, a sign that the sugars have dissolved properly.
Add the egg to the butter‑peanut mixture, beating just until the egg is fully blended. Over‑mixing at this stage can develop gluten, which we don’t want – we’re aiming for tenderness, not chewiness. Once the egg disappears, gradually fold in the dry ingredients you set aside earlier. Use a spatula to combine, scraping the sides of the bowl to ensure no flour pockets remain. The dough should be thick, slightly sticky, and hold its shape when you scoop it.
Now for the star of the show: the peanut butter filling. In a small bowl, combine the 1/2 cup creamy peanut butter with 1 cup powdered sugar and a pinch of salt. Stir until the mixture is smooth and glossy – it should look like a thick frosting. Scoop out tablespoon‑sized balls and place them on a parchment‑lined tray. Watch Out: If the balls are too soft, they’ll melt into the dough and lose their distinct pocket. That’s why we flash‑freeze them for 10 minutes, as mentioned earlier.
Watch Out: Skipping the freeze step often leads to a soggy center that spreads too much, ruining the cookie’s structural integrity.While the filling is chilling, divide the cookie dough into 1‑inch balls. Lightly dust your hands with flour to prevent sticking, then roll each piece into a smooth sphere. Place a frozen peanut butter ball in the center of each dough sphere, then gently press the dough around it, sealing the edges. The final shape should be a seamless ball with the filling completely encased – think a secret treasure hidden inside a chocolate shell.
Arrange the filled dough balls on a parchment‑lined baking sheet, spacing them about 2 inches apart. This gives them room to expand without merging into each other. Lightly sprinkle the tops with a pinch of sea salt – this tiny burst of salt will amplify the chocolate and peanut butter flavors when you bite into them. Pop the tray into the refrigerator for another 15‑20 minutes; this second chill helps the cookies keep their shape during the bake.
Preheat your oven to 350°F (175°C). When the oven is hot, transfer the chilled cookies onto the middle rack. Bake for 10‑12 minutes, or until the edges are set and the tops have a faint crackle. The cookies will look slightly undercooked in the center – that’s intentional, as the residual heat will finish cooking them while keeping the interior gooey. Keep a close eye; overbaking turns the centers dry and defeats the whole point.
Remove the cookies from the oven and let them cool on the baking sheet for 5 minutes before transferring them to a wire rack. This short rest allows the filling to settle and prevents it from spilling out. As they cool, the chocolate exterior will firm up, creating that satisfying snap you’ve been dreaming of. Serve warm for maximum ooze, or at room temperature if you prefer a firmer bite. Picture yourself pulling this out of the oven, the whole kitchen smelling incredible… and then taking that first bite.
That's it — you did it. But hold on, I've got a few more tricks that'll take this to another level…
Insider Tricks for Flawless Results
The Temperature Rule Nobody Follows
Most bakers set the oven to a static 350°F and forget about the oven’s hot spots. I recommend placing a small oven thermometer on the middle rack; if it reads higher than 355°F, lower the temperature by 10‑15 degrees. This prevents the edges from over‑browning while the center stays under‑cooked. Trust me, a few minutes of vigilance saves you from a batch of burnt‑outside, raw‑inside cookies.
Why Your Nose Knows Best
Your sense of smell is a more reliable indicator than a timer. When the cookies are about 9 minutes in, you’ll start to notice a sweet, nutty aroma wafting through the kitchen. That’s your cue to peek through the oven window. If the scent is strong but the tops still look pale, give them another minute; the interior will finish cooking in those final seconds.
The 5‑Minute Rest That Changes Everything
After baking, let the cookies rest on the sheet for exactly 5 minutes before moving them. This short pause lets the heat redistribute, finishing the cooking process gently and allowing the filling to set just enough to stay molten without spilling. Skipping this step often results in a soggy bottom and a messy plate.
Freeze‑Then‑Bake for Consistency
If you’re making a large batch for a party, freeze the assembled, filled dough balls on a tray for 30 minutes, then transfer them to a zip‑top bag. This way, you can bake them in batches without worrying about the dough spreading too much. The result? Uniformly sized cookies with identical gooey centers every single time.
Chocolate Chip Boost
Stir in half of the chocolate chips into the dough and reserve the other half for sprinkling on top. This creates pockets of melty chocolate throughout the cookie while also giving the surface a glossy, indulgent finish. A friend tried skipping the top sprinkle once — let’s just say the cookies looked good, but they missed that extra crunch factor.
Creative Twists and Variations
This recipe is a playground. Here are some of my favorite ways to switch things up:
Salted Caramel Swirl
Replace half of the peanut butter in the filling with a smooth caramel sauce, then sprinkle a pinch of flaky sea salt on top before baking. The result is a sweet‑salty caramel core that pairs beautifully with the chocolate exterior.
Espresso Infusion
Add 1 teaspoon of instant espresso powder to the dry ingredients. The coffee notes deepen the chocolate flavor, making the cookies feel more adult‑sophisticated – perfect for after‑dinner treats.
White Chocolate & Raspberry
Swap the semi‑sweet chocolate chips for white chocolate chips and fold in a tablespoon of freeze‑dried raspberry powder into the dough. The tangy raspberry cuts through the richness, delivering a bright burst of flavor.
Nutty Crunch
Fold chopped toasted peanuts or hazelnuts into the dough for an added crunch. The nuts echo the peanut butter filling while providing a satisfying bite.
Vegan Version
Replace the butter with a plant‑based solid margarine, use a flax egg (1 tbsp ground flaxseed + 3 tbsp water) instead of the large egg, and ensure the chocolate chips are dairy‑free. The texture remains indulgent, and the flavor stays true to the original.
Storing and Bringing It Back to Life
Fridge Storage
Place the cooled cookies in an airtight container lined with parchment paper. They’ll stay fresh for up to 5 days. The fridge helps keep the filling from becoming overly soft, preserving that perfect gooey center.
Freezer Friendly
For longer‑term storage, arrange the cookies on a baking sheet and freeze them solid, then transfer to a zip‑top freezer bag. They’ll keep for up to 3 months. When you’re ready to enjoy, let them thaw at room temperature for 15 minutes, then give them a quick 5‑minute bake at 300°F to revive the crisp edge.
Best Reheating Method
To bring back that fresh‑out‑of‑the‑oven feel, preheat your oven to 300°F, place the cookies on a parchment‑lined tray, and add a tiny splash of water (about a teaspoon) to the tray – the steam will re‑hydrate the interior, making the filling molten again while the exterior regains its snap.