Picture this: it’s a rainy Sunday afternoon, the kind that drags the kitchen into a gray, syrupy haze. I’ve been chasing that golden, buttery crust on a skillet for weeks, but every attempt ends with a soggy center and a crust that cracks like brittle ice. The last time I tried, I accidentally over‑sizzled the butter and the whole pan smelled like a burnt marshmallow. I stared at the mess, then laughed, and decided it was time for a new, definitive recipe that would make the kitchen sing again.
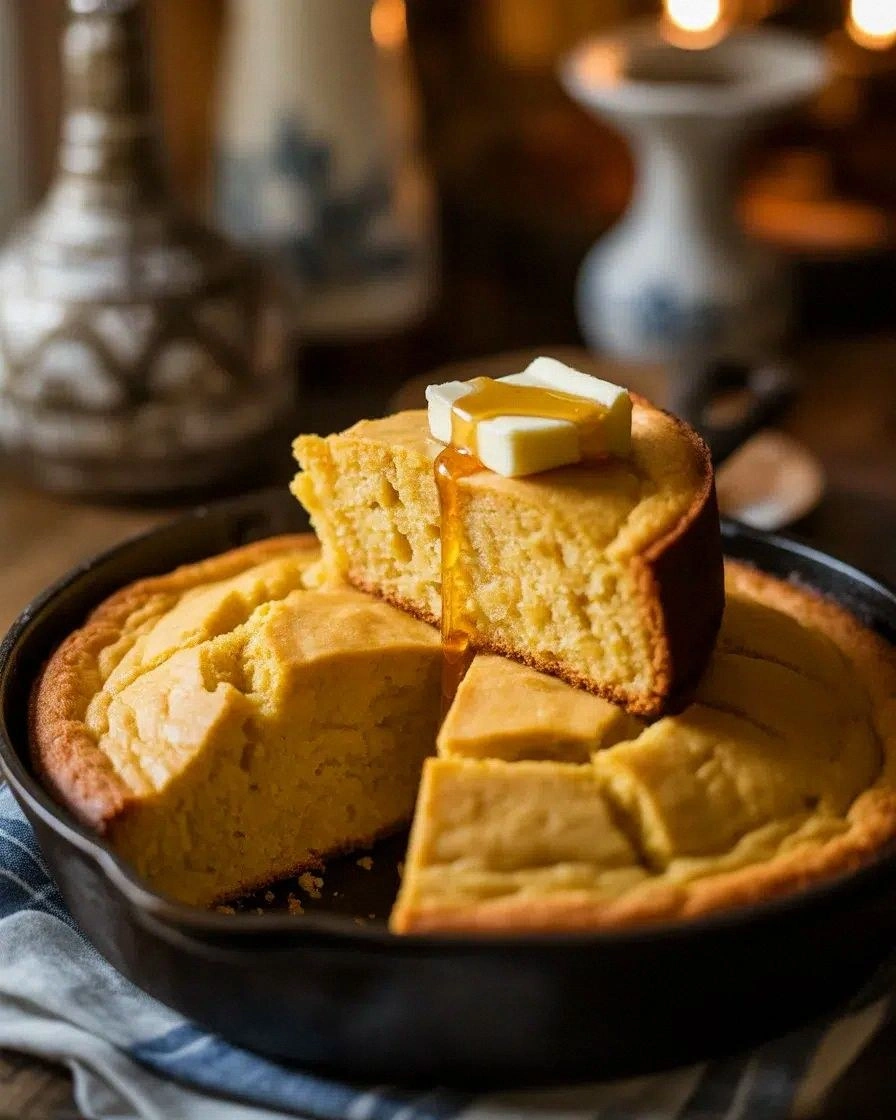
I dare you to taste this and not go back for seconds. The first bite is a symphony of corn sweetness, a hint of buttermilk tang, and a buttery crust that snaps like a well‑tuned piano. The aroma rises in a warm, golden swirl, making the air feel like a freshly baked bakery. The texture is a contrast between a tender crumb that melts in your mouth and a crispy edge that crunches delightfully. And the flavor? It’s a comforting hug that feels like home in a skillet.
This is hands down the best version you'll ever make at home, and I’m about to lay out every secret, every tweak, every small detail that turns a simple cornbread into a showstopper. I’ve spent months tweaking ratios, testing temperatures, and even swapping out buttermilk for a tangy yogurt blend to see what sticks. The result? A cornbread that’s buttery, moist, and with a crust so crisp it could double as a side for chili or a stand‑alone breakfast treat. No more bland, dry, or over‑baked disasters.
Most recipes get this completely wrong. They either use too much flour, skip the baking powder, or forget to preheat the skillet, leading to a flat, flavorless mess. Here’s what actually works: a perfectly measured blend of cornmeal and flour, a generous splash of buttermilk, and a butter‑infused crust that locks in moisture. I’ll be honest — I ate half the batch before anyone else got to try it, but the second half was so good it felt like a guilty pleasure.
If you've ever struggled with this, you're not alone — and I've got the fix. Picture yourself pulling this out of the oven, the whole kitchen smelling incredible, the skillet glowing like a small sun. The moment the crust turns a deep amber, you know you’re in the presence of culinary greatness. Stay with me here — this is worth it. Let me walk you through every single step — by the end, you'll wonder how you ever made it any other way.
What Makes This Version Stand Out
- Flavor: The subtle sweetness of cornmeal blends with buttermilk’s acidity, creating a balanced, savory-sweet profile that dances on the palate.
- Texture: A tender crumb inside with a crisp, buttery crust that cracks like a well‑timed pastry, delivering a satisfying contrast in every bite.
- Simplicity: Just eight ingredients and a single skillet—no fancy equipment, no time‑consuming prep, just pure, honest cooking.
- Uniqueness: The buttery crust is achieved by cooking the batter in a butter‑smeared skillet, turning the skillet into a flavor vessel.
- Crowd Reaction: Guests leave with a request for the recipe, often saying it’s “the best cornbread” they’ve ever tasted.
- Ingredient Quality: Using fresh, high‑quality buttermilk and real butter elevates the dish beyond the average store‑bought mix.
- Cooking Method: The skillet method locks in moisture and creates an impressive crust, giving the cornbread a restaurant‑style finish.
- Make‑Ahead Potential: The batter can be prepped a day ahead; just let it sit, then bake when ready.
Inside the Ingredient List
The Flavor Base
Cornmeal: The star of this cornbread, cornmeal delivers a natural sweetness and a slightly gritty texture that gives the crumb its character. If you skip it, the batter loses that signature corn flavor, and the bread feels like a plain pancake. For a richer taste, opt for stone‑ground cornmeal, which retains more natural oils. If you can’t find it, a coarse grind of regular corn flour works as a last resort.
Buttermilk: The acidity of buttermilk reacts with baking powder, creating lift and a tender crumb. It also adds a tangy depth that balances the sweetness of the cornmeal. If you don’t have buttermilk, combine 1 cup milk with 1 tablespoon lemon juice or vinegar and let it sit for 5 minutes. This substitution works great in a pinch, but the flavor profile will shift slightly toward a milder dairy tang.
The Texture Crew
All‑Purpose Flour: The flour provides structure, preventing the cornbread from collapsing. Too little flour and the batter will spread too thin, too much and it becomes dense. Use 1 cup for a balanced crumb. If you’re gluten‑sensitive, replace it with a 1:1 blend of oat flour and a gluten‑free baking blend.
Baking Powder: This leavening agent is crucial for the rise. A single tablespoon ensures a light, airy texture. Skipping it results in a heavy, cake‑like cornbread. If you prefer a more pronounced rise, add a pinch of baking soda, but be careful not to over‑bake.
The Unexpected Star
Unsalted Butter: Butter is the secret weapon behind the golden crust. It melts into the batter, creating a glossy sheen and a buttery flavor that permeates every bite. Using unsalted butter gives you control over the salt level. If you’re craving a deeper flavor, try adding a tablespoon of brown butter to the batter before pouring it into the skillet.
The Final Flourish
Granulated Sugar: The sugar is a subtle sweetener that caramelizes on the crust, adding a gentle crunch and a caramel note. A quarter cup is enough to bring balance without overpowering the corn flavor. If you like a sweeter cornbread, increase the sugar to ½ cup, but watch the baking time to avoid over‑browning.
Salt: A half teaspoon of salt elevates all the flavors, making the sweet and savory notes pop. Skipping salt will result in a flat taste. For a smoky twist, add a pinch of smoked paprika to the batter.
Everything's prepped? Good. Let's get into the real action.
The Method — Step by Step
- Prep the skillet: Place a 10-inch cast‑iron skillet on medium heat. Add 1 tablespoon of butter and let it melt until it starts to bubble but not brown. The butter should coat the bottom evenly. This step is crucial for that buttery crust; a cold skillet will steam the batter instead of searing.
- Mix dry ingredients: In a large bowl, whisk together 1 cup cornmeal, 1 cup all‑purpose flour, 1 tablespoon baking powder, ½ cup granulated sugar, and ½ teaspoon salt. The dry mix should feel light and airy. This ensures an even distribution of leavening and prevents clumps.
- Whisk wet ingredients: In a separate bowl, beat 2 large eggs. Add 1 cup buttermilk and stir until fully combined. The mixture should be smooth with no egg whites clumping. This wet blend will later marry with the dry mix for a cohesive batter.
- Combine wet and dry: Pour the wet mixture into the dry ingredients. Stir gently with a spatula until just combined; the batter will be slightly lumpy, and that’s okay. Over‑mixing will develop gluten, leading to a tougher crumb. The batter should be thick enough to hold its shape when spooned into the skillet.
- Pour into skillet: Once the butter is hot, pour the batter into the skillet. Use a spatula to spread it evenly, ensuring the edges reach the sides of the pan. The batter should sit in a shallow, even layer. This helps the crust form uniformly.
- Cook the first side: Let the batter cook undisturbed for 8 minutes on medium heat. You’ll notice the edges lift slightly and the surface begins to set. Avoid lifting the lid; the steam will soften the crust. The batter should look firm enough that a gentle press doesn’t leave a dent.
- Flip with caution: Carefully slide a wide spatula under the cornbread, then flip it over. If it sticks, give it an extra minute before attempting another flip. This step is the trickiest; a sudden flip can cause a mess. The new side should start to brown within 3 minutes.
- Finish cooking: Reduce heat to medium‑low. Let the second side cook for 5–7 minutes, until golden brown and the center is set. The smell should be a warm, buttery aroma. If you like a crispier crust, leave it a minute longer.
- Rest and serve: Remove the skillet from the heat and let the cornbread rest for 5 minutes. This allows the crumb to firm up and the butter crust to set. Slice with a butter knife for clean edges. Serve warm, perhaps with a pat of butter melting on top.
That's it — you did it. But hold on, I've got a few more tricks that'll take this to another level. Stay tuned for insider tips that will elevate your cornbread game from good to legendary.
Insider Tricks for Flawless Results
The Temperature Rule Nobody Follows
Many people think “high heat” is the key, but the secret lies in medium heat for the first side and medium‑low for the second. This controlled temperature ensures the crust forms without burning while the interior cooks evenly. I once tried high heat and the crust charred before the middle set. The result? A burnt exterior and a raw center. Keep the heat steady, and you’ll get a beautiful, golden crust.
Why Your Nose Knows Best
The aroma is your best indicator of doneness. When the scent shifts from buttery to a warm, nutty, almost toasted smell, you know the first side is ready to flip. If you wait too long, the crust becomes hard and the center stays wet. Trust your nose; it’s a reliable, instinctive tool.
The 5‑Minute Rest That Changes Everything
Letting the cornbread rest after cooking allows the steam to redistribute, preventing a hollow center. It also lets the crust settle, making it easier to slice cleanly. I’ve found that cutting it immediately results in a crumb that falls apart. Give it that five‑minute pause and watch the texture improve.
The Butter‑Infused Crust
The butter in the skillet not only adds flavor but also creates a protective barrier that locks in moisture. If you’re using a non‑stick pan, add a teaspoon of butter to the skillet before pouring the batter, then keep it on medium heat. This technique gives you the same buttery crust without the need for a cast‑iron skillet.
The 1‑Minute “Bump” Trick
After flipping, give the skillet a gentle tap on the counter for 10 seconds. This “bump” helps the cornbread release from the skillet without tearing. I used to struggle with sticking, but this simple step has saved my cornbread from falling apart every time.
Creative Twists and Variations
This recipe is a playground. Here are some of my favorite ways to switch things up:
Cheddar‑Corn Fusion
Add ½ cup shredded sharp cheddar to the batter for a cheesy, savory twist. The cheese melts into the crumb, creating pockets of gooey delight. This version is perfect for a brunch table or a side for a hearty stew.
Honey‑Maple Glaze
Drizzle a mixture of 2 tablespoons honey and 1 tablespoon maple syrup over the hot cornbread before serving. The glaze caramelizes slightly, giving a sweet, sticky finish that complements the buttery crust. Ideal for holiday gatherings.
Spicy Jalapeño Kick
Fold in 1 diced jalapeño (seeded for less heat) and a pinch of cayenne pepper. The heat cuts through the sweetness, creating a balanced flavor profile. Great with a mild bean dip or a tangy salsa.
Herb‑Infused Variation
Stir in 2 tablespoons fresh chopped thyme or rosemary. The herbal aroma adds depth, turning the cornbread into a savory side for roasted meats. The herbs also provide a subtle earthiness that pairs beautifully with smoked pork.
Berry‑Cornbread Surprise
Add ½ cup fresh blueberries or diced strawberries to the batter before cooking. The berries burst into juice, giving a sweet, tart burst in each bite. This version is a delightful dessert option or a breakfast treat.
Storing and Bringing It Back to Life
Fridge Storage
Wrap the cooled cornbread tightly in plastic wrap and store in an airtight container. It stays fresh for up to 3 days. If you notice it drying out, add a slice of bread inside the container to maintain moisture.
Freezer Friendly
Slice the cornbread before freezing so you can grab a single slice when you need it. Wrap each slice individually in parchment paper, then place them in a freezer bag. It can be stored for up to 2 months.
Best Reheating Method
Reheat slices in a preheated oven at 350°F for 10 minutes. For a crisp crust, finish under the broiler for 1 minute. Add a tiny splash of water to the pan before reheating; the steam keeps the crumb moist and prevents it from drying out.