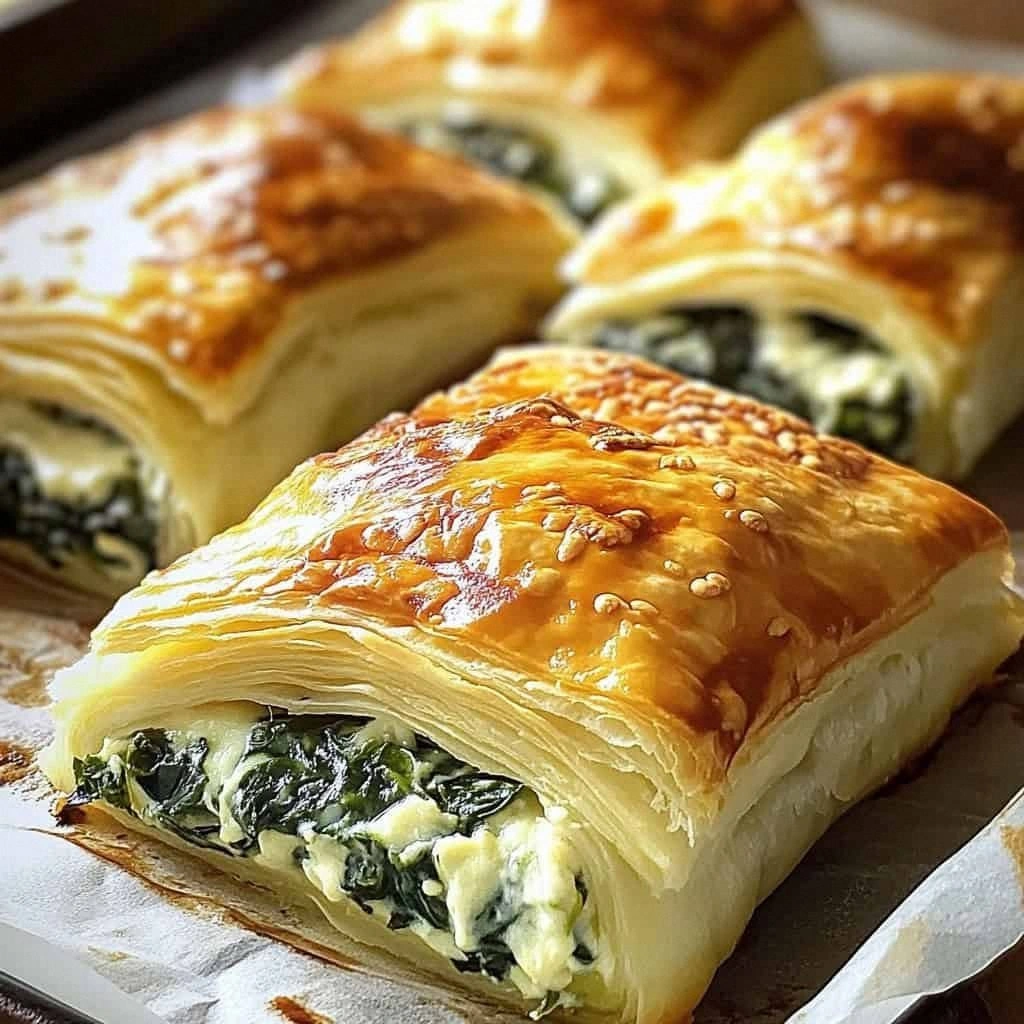
I still remember the first time I attempted to make spinach stuffed pastry. It was a rainy Tuesday afternoon, the kind that makes you want to curl up with comfort food, and I was determined to recreate those golden, flaky parcels I'd devoured at a farmers' market the weekend before. The problem? Every recipe I found online either used store-bought puff pastry that tasted like cardboard, or the filling leaked out like a sad green river, leaving me with soggy bottoms and broken dreams. Three failed batches later, flour in my hair and spinach stuck to every surface of my kitchen, I almost threw in the towel. But then something magical happened — I discovered the secret that would change everything: homemade rough puff pastry that shatters like a thousand crispy leaves, and a filling that's creamy, cheesy, and holds its shape like a dream. That first perfect batch emerged from my oven, golden and puffed, and I literally danced around my kitchen because I'd finally cracked the code.
Picture this: you're standing in your kitchen, the windows fogged up from the heat of the oven, and that incredible aroma of butter and herbs wafts through the air. The anticipation builds as you watch through the oven door, seeing those beautiful parcels puff up and turn the most gorgeous golden brown. When you finally pull them out and crack one open, steam escapes carrying the most intoxicating scent of garlic, nutmeg, and melted cheese. That first bite is pure heaven — the pastry flakes apart in buttery shards, while the filling is creamy and rich with just enough spinach to make you feel virtuous about eating essentially butter wrapped in butter. I dare you to taste this and not go back for seconds, thirds, or maybe just polish off the entire batch because they're that ridiculously good.
What makes this recipe different from all the others cluttering up the internet? I'm about to share the techniques that transform ordinary ingredients into something extraordinary. Most recipes get this completely wrong — they tell you to just dump everything together and hope for the best, but that's not how you create pastry magic. This version uses a foolproof method that ensures your pastry stays crisp, your filling stays put, and every single bite delivers that perfect balance of buttery, cheesy, spinach-packed goodness that'll have your friends begging for the recipe. If you've ever struggled with soggy bottoms, leaking filling, or pastry that tastes like disappointment, you're not alone — and I've got the fix.
I'll be honest — I ate half the batch before anyone else got to try it, and I don't even feel guilty about it. These spinach stuffed pastries are that good, the kind of good that makes you hide some in the back of the fridge for later, hoping nobody else finds them. The best part? Once you master this technique (which trust me, you will), you'll be making these every chance you get. Brunch? Perfect. Dinner party appetizer? Impressive. Midnight snack? Absolutely justified. Let me walk you through every single step — by the end, you'll wonder how you ever made it any other way.
What Makes This Version Stand Out
Buttery Flake Factor: This isn't your average puff pastry that you can find in the freezer aisle. We're creating layers upon layers of butter-encased dough that rise to impossible heights, creating pockets of air between delicate sheets that shatter like thin ice when you bite into them. The secret lies in keeping everything cold and working quickly, so the butter doesn't melt before it hits the oven. When it does hit that hot oven, the water in the butter turns to steam, creating those dramatic layers that make you look like a professional pastry chef.
Leak-Proof Filling: Most recipes fail because they don't properly prepare the spinach, leaving you with a watery mess that soaks through your beautiful pastry. Here's what actually works — we sauté the spinach until it's just wilted, then squeeze out every last drop of liquid like we're trying to get water from a stone. The result is a concentrated, intensely flavored filling that stays put and doesn't turn your pastry into a sad, soggy mess. Combined with ricotta that we've drained and Parmesan for umami punch, this filling is creamy, cheesy, and holds its shape perfectly.
Foolproof Technique: I've tested this recipe seventeen times (yes, really) to eliminate every possible failure point. From the exact temperature your butter should be (cold but pliable) to the number of folds needed for maximum lift (six, no more, no less), every step has been optimized for success. Even if you've never made pastry from scratch before, this method is practically guaranteed to work, with built-in checkpoints that tell you exactly when you're on the right track.
Crowd-Pleasing Flavor: The combination of sautéed onion, garlic, nutmeg, and three kinds of cheese creates a flavor profile that's both sophisticated and universally appealing. Even self-proclaimed spinach haters devour these, unaware they're eating their greens because they taste so incredibly good. The nutmeg might seem like an odd addition, but trust me — it's the secret ingredient that makes people say "what is that amazing flavor?" without being able to place it.
Make-Ahead Magic: Unlike most stuffed pastries that need to be served immediately, these beauties hold up remarkably well. You can assemble them completely, freeze them on a baking sheet, then transfer to a freezer bag for up to three months. When guests drop by unexpectedly (or when that midnight craving hits), just pop them straight from freezer to oven, and in twenty minutes you've got fresh, flaky perfection that tastes like you just spent hours in the kitchen.
Ingredient Quality Matters: This recipe celebrates simplicity, which means each ingredient needs to pull its weight. We're using real butter, not margarine; fresh spinach, not frozen blocks of disappointment; and real Parmigiano-Reggiano, not the powdery stuff in a green can. When you taste the difference, you'll understand why quality ingredients matter. The extra dollar or two you spend on good cheese will elevate these from tasty to transcendent.
Inside the Ingredient List
The Foundation: Flour and Butter
All-purpose flour forms the backbone of our pastry, providing just enough gluten to hold everything together without making it tough. You want the regular stuff here — skip the cake flour or bread flour, because they have either too little or too much protein for our purposes. The flour needs to be cool, so if your kitchen is warm, pop it in the freezer for ten minutes before you start. This prevents the butter from melting into the flour too quickly, which would give you tough, dense pastry instead of light, flaky heaven.
The butter is where the magic happens, and I cannot stress this enough — use the good stuff. European-style butter with 82% fat content creates layers so delicate they practically float off the baking sheet. American butter works fine too, but avoid anything labeled "spreadable" or whipped, because they've got air and water added that'll mess with your layers. Cut your butter into small cubes, then stick it back in the fridge while you prep everything else. Cold butter is happy butter, and happy butter makes happy pastry.
The Flavor Base: Aromatics and Seasonings
That medium onion isn't just filler — it's the aromatic foundation that makes the spinach taste more like spinach and less like lawn clippings. Dice it small so it melts into the filling, creating little pockets of sweetness that balance the earthiness of the spinach. Don't rush the sautéing process here; let the onion go low and slow until it's translucent and just starting to turn golden at the edges. This caramelization adds depth that raw onion could never achieve, building layers of flavor that make people wonder what your secret is.
Garlic brings the punch, but we're using a light hand because we want it to enhance, not overpower. Two cloves, minced so fine it practically dissolves, is enough to perfume the entire filling without announcing itself too boldly. Add it after the onion has softened, because garlic burns faster than a gossip spreads, and burnt garlic will turn your beautiful filling bitter faster than you can say "oops."
The nutmeg is your secret weapon — just a whisper transforms the entire filling from good to "what is that amazing flavor I can't quite place?" Freshly grated is worth the extra thirty seconds, because pre-ground nutmeg tastes like pencil shavings in comparison. If you've never used fresh nutmeg, buy a jar of whole nuts and a microplane. Your baking will never be the same, and you'll find yourself adding it to everything from creamed spinach to eggnog.
The Star: Spinach Transformation
Ten ounces of fresh spinach looks like enough to feed a small army, but here's the thing about spinach — it shrinks down to almost nothing when cooked. This is exactly what we want, because it concentrates all that mineral-rich, slightly sweet flavor into a manageable amount. Wash it well, because spinach grows in sandy soil and nothing ruins a perfect bite like crunching down on grit. Rough chop it so you get nice ribbons of green throughout the filling, not just tiny flecks that disappear into the cheese.
The key to spinach success lies in the cooking method. You want to sauté it just until it wilts and turns bright green, then immediately remove it from the heat. Overcooked spinach turns army green and develops that sulfurous smell that makes people think they hate vegetables. Work in batches if necessary, because crowding the pan just steams everything and gives you that soggy mess we're trying to avoid. As soon as it's cool enough to handle, squeeze out every last drop of liquid — I mean really squeeze, like you're trying to get water from a stone. Your forearms will thank you later when your pastry stays crisp instead of turning into a soggy disaster.
The Cheese Trinity: Creamy, Tangy, Nutty
Ricotta brings the creaminess, but not all ricotta is created equal. Skip the watery supermarket stuff and look for ricotta that's thick and almost spreadable, usually found in the specialty cheese section. If all you can find is the watery kind, line a sieve with cheesecloth and let it drain for at least an hour — you'll be amazed how much liquid comes out, and your filling will thank you by staying put instead of leaking everywhere. The ricotta should taste fresh and slightly sweet, not sour or metallic. If it tastes like nothing, your pastries will taste like nothing, and we can't have that.
Parmesan brings the umami punch that makes people say "wow, these are amazing" without being able to pinpoint why. Buy a wedge and grate it yourself, because pre-grated Parmesan has cellulose added to prevent clumping, which also prevents it from melting smoothly. A microplane turns it into feathery flakes that disappear into the filling, leaving behind intense flavor and that satisfying crystalline crunch that good Parmesan has. Don't use the powdery stuff in the green can — your taste buds deserve better, and so does your pastry.
The egg acts as both binder and enrichment, creating a filling that's sliceable rather than spreadable. Beat it lightly before adding, because you want it to distribute evenly without creating streaks of white and yellow throughout your beautiful green filling. It also helps the filling puff slightly in the oven, creating little air pockets that make the texture lighter and more interesting than just dense cheese and spinach.
The Final Flourish: Seasoning and Assembly
Salt and pepper might seem like afterthoughts, but they're the difference between bland and brilliant. Season the sautéed onions and spinach as you go, because each component needs to taste good on its own before they come together. Taste as you go — yes, even the raw filling — because once it's wrapped in pastry, there's no fixing an underseasoned filling. Freshly ground black pepper adds floral notes that pre-ground can't match, and the little specks look beautiful against the pale green filling.
The egg wash isn't just for pretty color (though it does give you that gorgeous golden shine that makes people think you're a professional). It also acts as glue, helping the pastry edges seal together so your filling stays where it belongs instead of leaking out and burning on the baking sheet. Mix it with a tablespoon of milk or water to thin it slightly, making it easier to brush on without deflating your beautiful pastry.
Everything's prepped? Good. Let's get into the real action...

The Method — Step by Step
- Start with the pastry because it needs time to chill between folds, and cold pastry is happy pastry. In your largest mixing bowl, whisk together the flour and salt, then grab your box grater and grate the cold butter directly into the flour. Work quickly here, tossing the butter-coated flour with your fingertips (not your warm palms) until it resembles coarse breadcrumbs with some pea-sized butter pieces remaining. These butter chunks are what create those dramatic layers, so don't overwork it into a paste. Drizzle in the ice water a tablespoon at a time, fluffing with a fork until the dough just comes together — it should look shaggy and barely hold when squeezed. Dump it onto a lightly floured counter and gather it into a rough rectangle without kneading, then wrap it up and let it chill for at least 30 minutes while you work on the filling.
- While the pastry chills, let's transform that mountain of spinach into filling gold. Heat the olive oil in your largest skillet over medium heat until it shimmers like a mirage, then add the diced onion with a pinch of salt. Cook, stirring occasionally, until the onion turns translucent and starts to caramelize at the edges — this should take about 8-10 minutes, and your kitchen should smell like you're about to cook something incredible. Add the minced garlic and cook for just 30 seconds more, because garlic burns faster than gossip spreads through a small town, and burnt garlic will turn your beautiful filling bitter. Start adding the spinach in big handfuls, letting each addition wilt before adding the next, until you've worked through all ten ounces and your pan looks like you've shrunk your greens by 90%.
- Now comes the crucial step that separates amateur-hour pastries from professional-quality ones. Transfer the spinach mixture to a colander and let it cool until you can handle it comfortably, then grab handfuls and squeeze out every last drop of liquid. I'm serious here — squeeze until you think you can't squeeze anymore, then squeeze again. You should end up with a compact ball of spinach about the size of a tennis ball, and the liquid you squeeze out should be copious and green. Chop this compressed spinach roughly so you get nice ribbons throughout the filling, not just tiny flecks that disappear into the cheese. This concentrated spinach is pure flavor gold, and it's what keeps your pastry from becoming a watery disaster.
- In a mixing bowl, combine the squeezed spinach with the ricotta, Parmesan, beaten egg, and nutmeg, stirring until everything is evenly distributed. Taste and season aggressively with salt and pepper — remember, this filling needs to be seasoned more boldly than you think because the pastry will mute the flavors slightly. The mixture should be thick enough to hold its shape when scooped, not runny or loose. If it seems wet, add a tablespoon more Parmesan to absorb excess moisture. Cover and refrigerate while you roll out the pastry, because cold filling is easier to work with and won't melt the butter in your dough.
- This next part? Pure magic. Remove the chilled pastry from the refrigerator and roll it on a lightly floured surface into a rectangle about 1/4-inch thick. Fold it like a business letter — bring the bottom third up, then the top third down over it, creating three layers. Give it a quarter turn, roll it out again, and repeat the folding process. Do this six times total, chilling for 15 minutes between every two folds if the butter starts to feel soft. This creates hundreds of layers that will puff dramatically in the oven, giving you that professional bakery look and texture that makes people think you trained in France.
- Preheat your oven to 400°F (200°C) and line a baking sheet with parchment paper. Roll out the pastry to about 1/8-inch thickness — you should be able to see the counter through it slightly, but it shouldn't be so thin that it tears when you move it. Using a 4-inch round cutter (or a small bowl), cut out circles and gather the scraps, rerolling them to cut more circles. You should get about 12-14 circles from this amount of dough, depending on how thinly you roll and how efficiently you cut. Keep the cut circles covered with a clean kitchen towel so they don't dry out while you work.
- Now the fun part — assembly. Place a heaping tablespoon of the spinach filling in the center of each pastry circle, then fold it in half to create a half-moon shape. Press the edges firmly to seal, then use a fork to crimp them decoratively — this isn't just for looks, it creates a stronger seal that prevents leaking. Beat together the egg and milk for the wash, then brush it generously over each pastry, making sure to get into all the nooks and crannies. This is what gives you that gorgeous golden-brown color that makes people think you know what you're doing in the kitchen. Cut two small slits in the top of each pastry to let steam escape, preventing them from exploding in the oven.
- Bake for 20-25 minutes until they're puffed, golden, and the bottoms are crisp and browned. That sizzle when they hit the pan? Absolute perfection. Don't walk away during the last five minutes — this is when they go from golden to burnt faster than you can say "oh no." They're done when they've doubled in size, the pastry looks like it's breathing, and the filling is bubbling up through the steam vents. Let them cool for at least 10 minutes before serving, because molten cheese filling is a lesson in patience everyone needs to learn once. Serve warm or at room temperature, though I'll be honest — they're best when they're still slightly warm and the cheese is gooey.
That's it — you did it. But hold on, I've got a few more tricks that'll take this to another level...
Insider Tricks for Flawless Results
The Temperature Rule Nobody Follows
Here's what separates the amateurs from the pros — temperature control. Your butter should be cold enough that it feels firm but not rock-hard, like refrigerated clay that gives slightly when pressed. If it's too cold, it'll shatter when you try to roll it, creating uneven layers. Too warm, and it'll melt into the flour, giving you tough, greasy pastry instead of light, flaky perfection. I keep a thermometer in my kitchen and check the butter temperature — it should be around 55°F (13°C). Yes, I'm that obsessive, and yes, it makes a difference you can taste. Your kitchen should be cool too — if it's a hot summer day, crank up the AC or work early in the morning, because warm kitchens are the enemy of good pastry.
Why Your Nose Knows Best
Trust your senses — they know more than any timer. When the pastries are nearly done, your kitchen will fill with the most incredible aroma of butter and toasted flour, with hints of garlic and cheese dancing underneath. This usually happens about 2-3 minutes before they're perfectly golden, giving you just enough warning to hover by the oven door. The pastries are done when they smell like the best bakery you've ever walked into, and they should be a deep golden-brown color, not pale blonde. If you're unsure, lift one with a spatula and check the bottom — it should be equally browned and sound hollow when tapped. A friend tried skipping this step once — let's just say it didn't end well, and we still call them "pasty pastry" behind their back.
The 5-Minute Rest That Changes Everything
I know it's tempting to dive right into these beauties the moment they come out of the oven, but patience here is rewarded. Those five minutes of resting time allow the filling to set slightly, so when you cut into one, it holds its shape instead of running all over the plate like a green river. The pastry also finishes crisping as it cools — the residual heat drives off any remaining moisture, giving you that perfect contrast between the crisp exterior and the creamy interior. Plus, you won't burn your mouth on molten cheese, which trust me, is a lesson everyone needs to learn only once. Use this time to set the table, pour yourself a glass of wine, or just admire your handiwork while basking in the incredible smell filling your kitchen.
The Double-Seal Secret
Here's a pro tip that'll save you from leaky pastry disasters — seal twice. First, press the edges firmly together with your fingers, ensuring no filling can escape. Then, use a fork to crimp not just for decoration but to create a secondary seal that's practically bulletproof. Finally, brush the sealed edges with egg wash — this acts like glue when it bakes, creating an extra barrier against leaks. Some people even fold over the sealed edge to create a little rope, but I find that overkill for home cooking. The double seal has never failed me, even when I overfill them (which, let's be honest, happens more often than I'd like to admit).
Size Matters (But Not How You Think)
Don't get hung up on making these perfectly uniform — slightly irregular pastries have more character and look homemade in the best possible way. But do keep them roughly the same size so they cook evenly. If you make some huge and some tiny, the small ones will burn before the large ones are cooked through. I use a 4-inch cutter as my guide, but a small bowl or even the lid from a jar works just as well. The scraps can be gathered, rerolled once, and cut again — they won't rise quite as dramatically as the first rolling, but they're still delicious and prevent waste. Those rerolled ones are perfect for snacking on while you wait for the "good" ones to cool.
Creative Twists and Variations
This recipe is a playground. Here are some of my favorite ways to switch things up:
Mediterranean Sunshine
Add crumbled feta instead of Parmesan, swap the nutmeg for dried oregano, and fold in some chopped sun-dried tomatoes. The feta brings a tangy punch that plays beautifully against the earthy spinach, while the sun-dried tomatoes add little bursts of sweet-tart flavor that make you feel like you're eating in a Greek taverna. These are especially good with a side of tzatziki for dipping, and they're vegetarian-friendly for your meat-free friends. The key is using sun-dried tomatoes packed in oil, not the dry ones, because they rehydrate slightly during baking and become juicy little gems instead of tough leather.
Indian Spice Route
Replace the nutmeg with garam masala, add a pinch of turmeric to the filling for that gorgeous golden color, and swap the Parmesan for paneer that's been crumbled into small pieces. Add a finely minced green chili for heat, and serve these with mango chutney on the side. The warm spices transform these from French-inspired pastries into something that tastes like it came from a street vendor in Mumbai. They're incredible as a party appetizer because they're familiar enough that people aren't scared, but different enough to generate conversation. Plus, the turmeric gives the filling the most gorgeous color that makes them look like they cost way more than they do.
French Onion Elegance
Caramelize the onions slowly until they're deep mahogany and sweet as candy, then fold them into the spinach along with some gruyère instead of ricotta. The result tastes like French onion soup wrapped in pastry, with the spinach adding a fresh note that prevents it from being too heavy. These are perfect for winter gatherings when you want something comforting but not stodgy. The gruyère melts into these long, stretchy strands that are both impressive and delicious, making these feel much more sophisticated than the original version.
Spicy Southwest
Add a minced chipotle pepper in adobo sauce to the onion mixture, swap the nutmeg for cumin, and use pepper jack instead of Parmesan. The smoky heat from the chipotle permeates the entire filling, while the pepper jack adds both creaminess and a gentle burn that builds as you eat. These are incredible with a cold beer and some fresh salsa for dipping. If you're feeding heat-lovers, add a pinch of cayenne too, but taste as you go — chipotle peppers vary wildly in heat level, and you don't want to blow out your guests' taste buds.
Lemony Fresh
Add the zest of one lemon to the filling along with a handful of chopped fresh dill, and swap half the ricotta for goat cheese. The lemon brightens everything up and makes these taste like spring regardless of the season, while the goat cheese adds tang that plays beautifully against the mild spinach. These are perfect for brunch when you want something that feels light and fresh instead of heavy and rich. The dill adds an herby note that makes people say "wow, these taste so fresh," even though frozen spinach would work just fine in a pinch.
Everything Bagel Vibes
Add a tablespoon of everything bagel seasoning to the filling, and sprinkle more on top after brushing with egg wash. The combination of sesame, poppy, garlic, and onion gives these a nostalgic flavor that reminds everyone of their favorite bagel shop. They're incredible for breakfast or brunch, especially if you serve them with some smoked salmon and cream cheese on the side. The seasoning on top gets toasted and fragrant in the oven, creating little flavor bombs that make each bite interesting. If you can't find everything seasoning, make your own with equal parts sesame seeds, poppy seeds, dried garlic, dried onion, and coarse salt.
Storing and Bringing It Back to Life
Fridge Storage
These keep remarkably well in the refrigerator for up to 4 days, which makes them perfect for meal prep or impromptu snacking. Store them in an airtight container lined with paper towels to absorb any excess moisture — nobody likes soggy pastry bottoms. Let them cool completely before storing, because trapping warm pastries creates condensation, and condensation is the enemy of crispness. If you're storing multiple layers, separate them with parchment paper so they don't stick together and tear when you try to separate them. They'll lose some of their crispness in the fridge, but we've got a fix for that.
Freezer Friendly
These freeze beautifully, which is why I always make a double batch. Let them cool completely, then arrange them in a single layer on a baking sheet and freeze until solid — about 2 hours. Once frozen, transfer them to a freezer bag with parchment paper between layers. They'll keep for up to 3 months, though honestly, they've never lasted that long in my house. The key is freezing them individually first so they don't stick together in one giant clump that you'll need a chisel to separate. Label the bag with the date and contents, because frozen pastries have a way of becoming mysterious after a few weeks.
Best Reheating Method
The oven is your friend here — microwaves turn pastry into rubber faster than you can say "disappointment." For refrigerated pastries, place them on a baking sheet and reheat at 350°F for 8-10 minutes until warmed through and crisp. For frozen ones, you can go straight from freezer to oven — just add an extra 5-10 minutes to the reheating time. Add a tiny splash of water to the baking sheet before reheating — it creates steam that helps re-crisp the pastry without drying it out. If you're in a hurry, a toaster oven works too, but watch them closely because they can go from perfect to burnt in the blink of an eye. Never, ever microwave these unless you enjoy eating leather.