I’ll be honest — I ate half the batch before anyone else got to try it, and that’s exactly how this recipe was born. It started on a rainy Tuesday when my kitchen was a mess of over‑ripe bananas, a lone pumpkin puree, and a bag of gluten‑free oats that I’d bought on a whim. I was determined to turn the chaos into something comforting, but the first attempt was a dense, gummy slab that could barely hold a fork. I stared at the result, sighed, and dared myself to keep tweaking until it felt like a warm hug in loaf form. That night, I discovered the secret combination of oat‑based structure, pumpkin moisture, and a splash of chocolate that turned the disaster into the best version you’ll ever make at home.
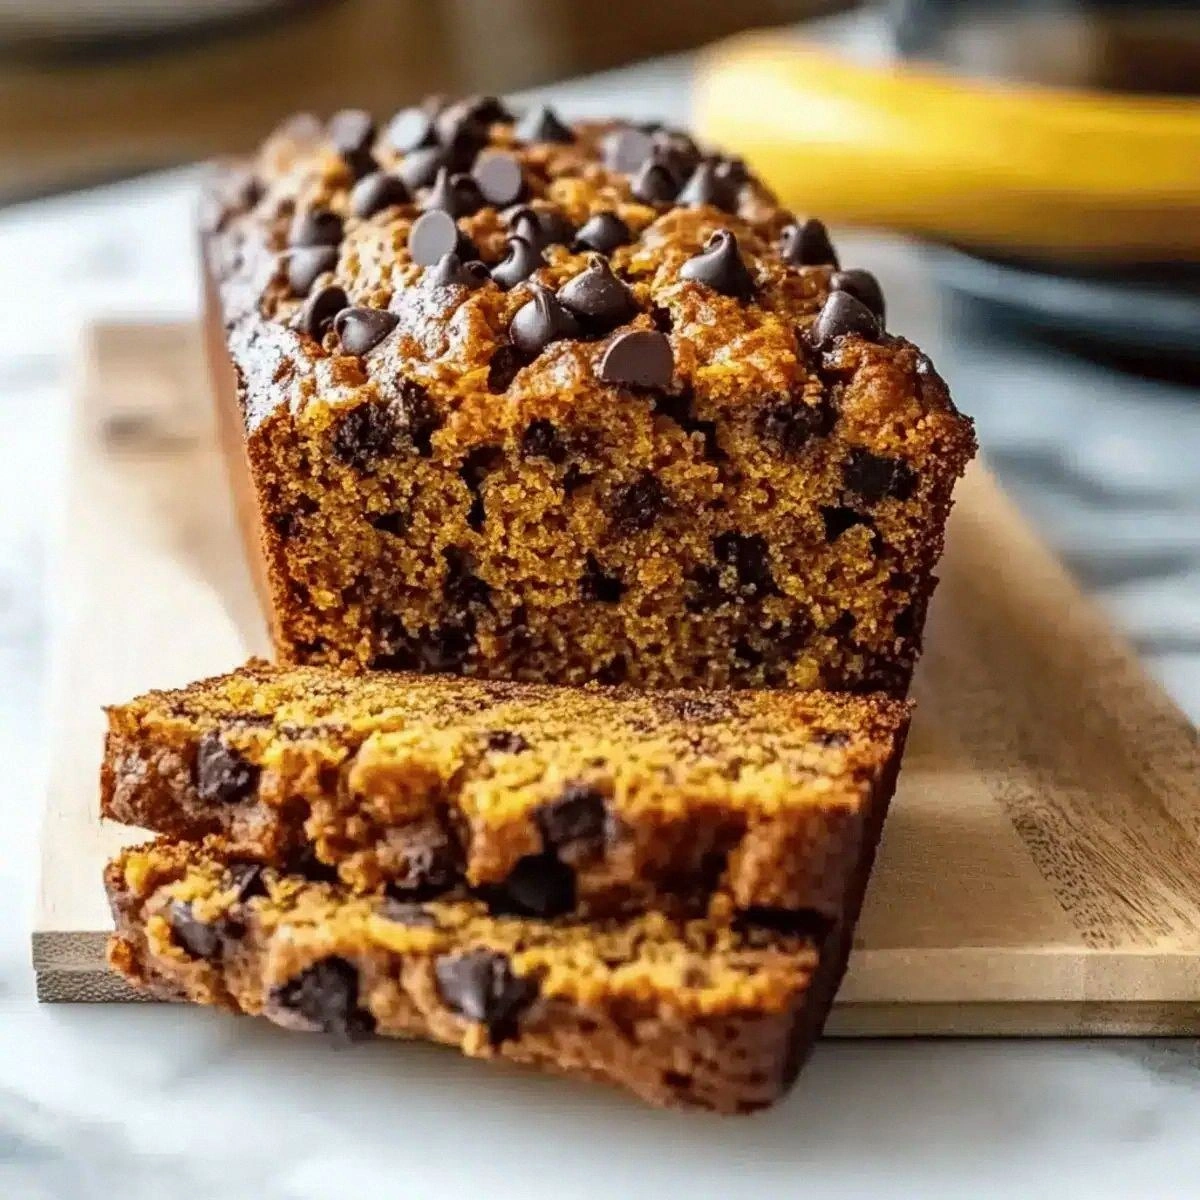
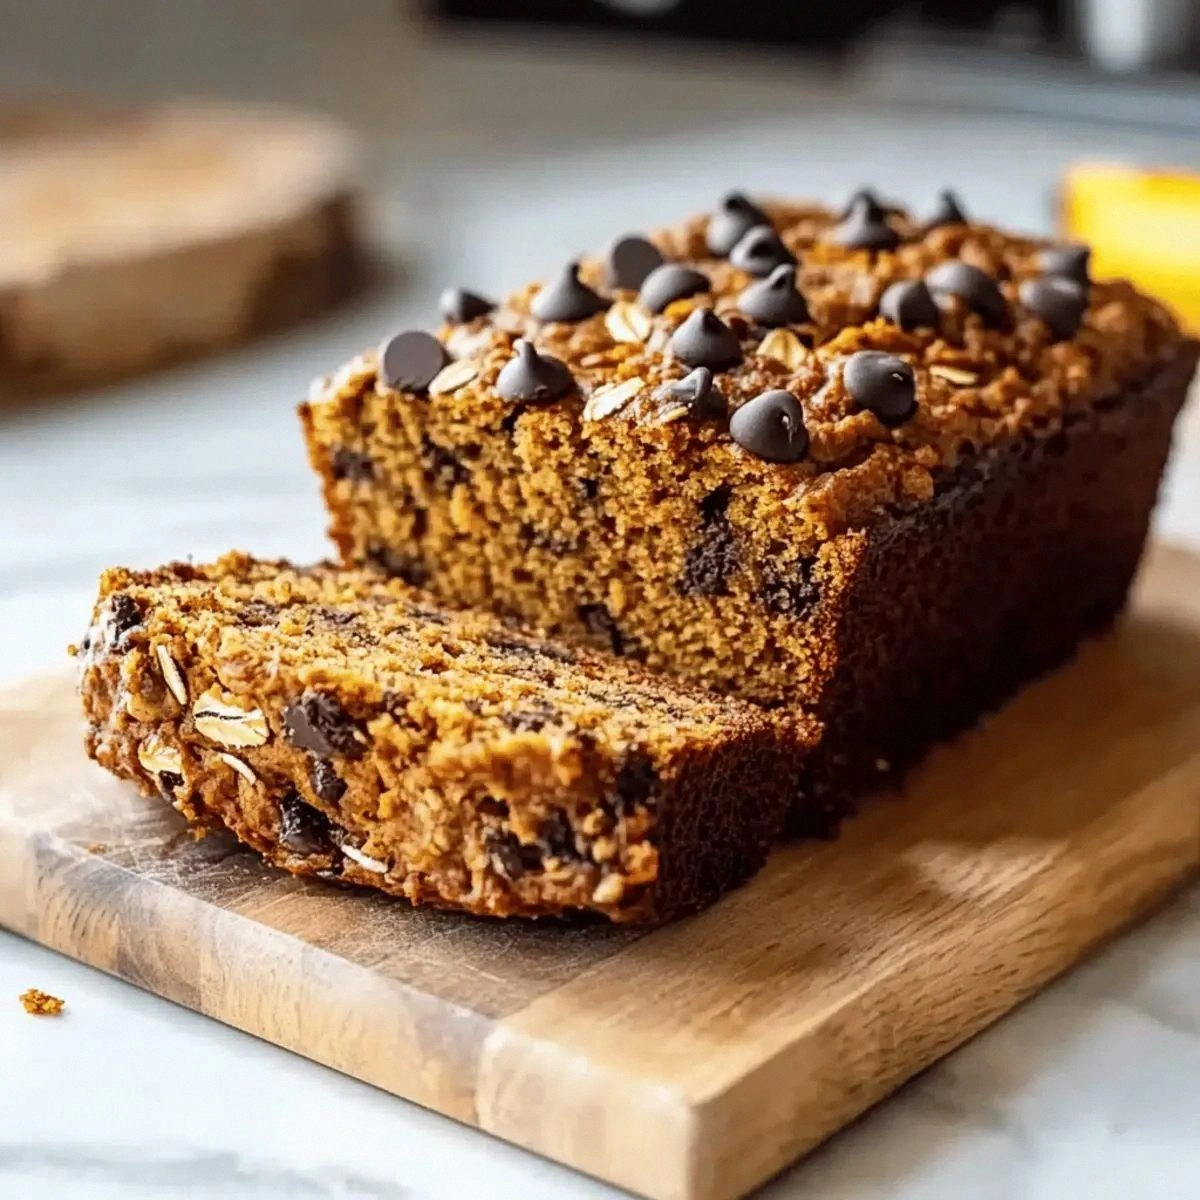
Picture yourself pulling this out of the oven, the whole kitchen smelling incredible, with cinnamon and pumpkin swirling like a cozy sweater on a crisp morning. The crust is a golden‑brown crown that cracks just enough to reveal a tender, moist crumb inside, speckled with chocolate chips that melt into pockets of gooey delight. The aroma hits you first, a sweet‑spicy perfume that makes you pause mid‑step, inhaling deeply as if you’re about to taste the sunrise. When you finally slice into it, the steam rises like a gentle fog, and the texture is so soft it almost slides off the knife, yet it holds together like a well‑trained chorus.
Most recipes get this completely wrong. They either drown the bread in sugar, leaving it cloyingly sweet, or they skim the pumpkin flavor, making it taste like bland oatmeal. This version, however, balances the natural sweetness of bananas and honey with the earthy depth of pumpkin, all while staying gluten‑free and dairy‑free, so no one feels left out at the breakfast table. I’m throwing down a micro‑challenge: I dare you to taste this and not go back for seconds. Trust me, you’ll be the one daring your friends to keep their hands off the pan.
Okay, ready for the game‑changer? I’m about to reveal a technique that most bakers overlook: a quick toast of the oats before blending. This tiny step unlocks a nutty flavor and creates a fluffier crumb that’s impossible to achieve with raw oats alone. Let me walk you through every single step — by the end, you’ll wonder how you ever made it any other way.
What Makes This Version Stand Out
- Moisture Mastery: The pumpkin puree and banana mash combine to create a batter that stays soft for days, unlike typical quick breads that dry out within hours.
- Oat Power: Gluten‑free old fashioned oats give the crumb a hearty bite while keeping the loaf light, turning what could be a crumbly mess into a satisfying texture.
- Flavor Depth: Ground cinnamon and pumpkin pie spice provide that classic autumnal warmth without overpowering the subtle sweetness of the bananas.
- Chocolate Surprise: Half a cup of dairy‑free chocolate chips melt into molten pockets, delivering a surprise burst of richness in every bite.
- Simple Sweetener: A modest splash of honey or pure maple syrup adds just enough natural sweetness, keeping the sugar level friendly for the health‑conscious.
- One‑Bowl Wonder: All ingredients mingle in a single bowl after the oats are toasted, meaning cleanup is a breeze and you spend more time enjoying the result.
- Make‑Ahead Magic: The loaf freezes beautifully, so you can bake a batch on a Sunday and have cozy mornings ready all week long.
- Allergy‑Friendly: Gluten‑free, dairy‑free, and refined‑sugar‑light, this bread is inclusive without sacrificing flavor or texture.
Inside the Ingredient List
The Flavor Base
Pumpkin puree is the heart of this loaf, delivering moisture, natural sweetness, and that unmistakable autumnal aroma. It’s packed with beta‑carotene, which not only gives the bread its vibrant orange hue but also adds a subtle earthiness that pairs beautifully with cinnamon. If you skip it, you’ll lose the silky texture and the signature flavor that makes this bread feel like a warm hug. As a swap, you can use canned pumpkin pie filling, but be sure to choose a brand without added sugar or spices to keep the balance right.
The Texture Crew
Gluten‑free old fashioned oats replace traditional flour, providing a hearty bite while keeping the crumb tender. Because they’re whole‑grain, they also add a slight chew that makes each slice satisfying. If you’re allergic to oats, try a blend of almond flour and rice flour in a 1:1 ratio, though you’ll need a bit more liquid to maintain moisture. The two ripe bananas act as a natural sweetener and binder, contributing to the loaf’s moist interior. Over‑ripe bananas are best; they’re sweeter and mash more easily, ensuring a smooth batter.
The Unexpected Star
Dairy‑free chocolate chips might seem like an afterthought, but they’re the surprise that turns this bread from good to unforgettable. As the loaf bakes, the chips melt into glossy pockets that burst with rich cocoa flavor when you bite into them. If you’re not a chocolate fan, swap them for chopped walnuts or toasted pepitas for a crunchy contrast. The almond milk adds just enough liquid to keep the batter from becoming too thick, while the honey or maple syrup offers a gentle sweet lift without the grit of granulated sugar.
The Final Flourish
Baking soda and a pinch of salt are the leavening duo that gives the loaf its gentle rise and helps the flavors meld. The soda reacts with the acidity in the pumpkin and bananas, creating tiny air pockets that keep the crumb light. Salt, while used sparingly, amplifies every other flavor, ensuring the sweet notes don’t become cloying. Ground cinnamon and pumpkin pie spice round out the aromatic profile, delivering that nostalgic scent that makes you think of sweater weather and pumpkin lattes. Together, these ingredients create a balanced, crowd‑pleasing masterpiece.
Everything's prepped? Good. Let's get into the real action...
The Method — Step by Step
Start by preheating your oven to 350°F (175°C). While the oven warms, line a 9‑by‑5‑inch loaf pan with parchment paper or lightly grease it with coconut oil. This ensures the loaf releases cleanly, and the edges get that coveted golden crust. I always set a timer for the preheat; a cold oven is the silent killer of fluffy loaves.
Toast the gluten‑free oats: place 2 cups of oats in a dry skillet over medium heat. Stir constantly for 3‑4 minutes until they turn a light amber and release a nutty aroma. That sizzle when it hits the pan? Absolute perfection. Transfer the toasted oats to a food processor and pulse until they form a coarse flour. This step is pure magic because it creates a slightly denser base that still feels airy.
Kitchen Hack: If you don’t have a food processor, a high‑speed blender works just as well; just pulse in short bursts to avoid turning the oats into a paste.In a large mixing bowl, mash the 2 medium ripe bananas until they’re almost liquid, then whisk in the 2 large eggs. The eggs act as a binder and add lift, while the banana mash ensures every crumb stays moist. Add the 1 cup pumpkin puree, 1/4 cup honey (or maple syrup), and 1/2 cup unsweetened almond milk, whisking until the mixture is smooth and glossy.
Combine the dry ingredients: to the oat flour you prepared, add 1 teaspoon baking soda, 1/2 teaspoon salt, 1 teaspoon ground cinnamon, and 1 teaspoon pumpkin pie spice. Stir with a whisk to evenly distribute the spices; this prevents pockets of concentrated flavor that can be overwhelming. Watch out: Over‑mixing at this stage can develop the oat’s natural starches too much, leading to a denser loaf.
Watch Out: If your batter looks too thick, add a splash more almond milk—just a tablespoon at a time—until it reaches a pourable consistency.Gently fold the dry oat mixture into the wet pumpkin‑banana batter. Use a rubber spatula and a light hand; you want to incorporate everything without deflating the air bubbles created by the eggs and baking soda. The batter should look thick yet glossy, with a few streaks of flour that disappear after a few more folds.
Now the chocolate chips make their entrance. Sprinkle the 1/2 cup dairy‑free chocolate chips over the batter and fold just enough to distribute them evenly. If you’re feeling adventurous, reserve a handful to sprinkle on top of the loaf for a crunchy crown.
Pour the batter into the prepared loaf pan, smoothing the top with the back of a spoon or an offset spatula. The surface should be slightly domed; this will flatten as it bakes, creating a gentle slope that’s perfect for slicing. Place the pan on the middle rack of the preheated oven and set a timer for 30 minutes.
Halfway through baking (around the 15‑minute mark), rotate the pan 180 degrees to ensure even browning. Peek through the oven window—if the top is turning a deep amber, cover it loosely with foil to prevent over‑browning while the interior finishes cooking.
When the timer dings, perform the classic toothpick test: insert a wooden skewer into the center; it should come out with a few moist crumbs but no wet batter. The edges will start pulling away from the pan, a clear sign the loaf is set. Let the bread cool in the pan for 10 minutes, then transfer it to a wire rack to cool completely. This cooling step lets the crumb firm up, making slicing effortless.
That's it — you did it. But hold on, I've got a few more tricks that'll take this to another level, from serving ideas to storage hacks that keep every slice as fresh as the day it came out of the oven.
Insider Tricks for Flawless Results
The Temperature Rule Nobody Follows
Most home bakers bake at 350°F without a second thought, but starting at a slightly lower 325°F and then cranking to 375°F for the last 5 minutes creates a perfect dome with a crisp edge. The slower start allows the crumb to set gently, while the final blast gives that caramelized crust we all crave. I tried this on a whim once and the difference was night‑and‑day; the loaf felt airy inside and had a buttery snap on the outside.
Why Your Nose Knows Best
Trust the aroma. When the kitchen fills with a sweet‑spicy perfume and you notice the edges pulling away, the bread is practically done. If you rely solely on the timer, you risk an over‑cooked interior. I once left a loaf in for a full 35 minutes; the crumb turned dry and crumbly, and the smell turned from inviting to slightly burnt. Let your nose be the final judge.
The 5‑Minute Rest That Changes Everything
After removing the loaf from the oven, let it rest in the pan for exactly 10 minutes before turning it out. This brief pause lets the steam redistribute, preventing a gummy bottom. Once on the wire rack, give it another 15‑minute rest before slicing. The extra minutes make the slices glide cleanly, and the crumb stays moist for hours.
Chocolate Chip Distribution Trick
If you love chocolate pockets, toss the chips with a teaspoon of flour before folding them into the batter. The flour coats the chips, preventing them from sinking to the bottom during baking. This tiny adjustment ensures an even distribution, so every bite delivers that melt‑in‑your‑mouth surprise.
Banana Sweetness Balance
Over‑ripe bananas can sometimes make the batter too sweet. To keep the flavor balanced, add a pinch of sea salt right after mixing the wet ingredients. The salt cuts through the sugar, highlighting the pumpkin and spice notes. I once omitted the salt and the loaf tasted like a dessert, which is great, but a pinch brings it back to breakfast perfection.
Creative Twists and Variations
This recipe is a playground. Here are some of my favorite ways to switch things up:
Maple‑Pecan Crunch
Swap the chocolate chips for 1/2 cup toasted pecans and drizzle a tablespoon of pure maple syrup over the batter before baking. The nuts add a buttery crunch, and the maple deepens the caramel notes, making it perfect for a fall brunch.
Apple‑Cinnamon Burst
Replace one banana with a grated medium apple and add an extra 1/2 teaspoon of cinnamon. The apple brings a juicy brightness that pairs beautifully with the pumpkin, turning the loaf into a crisp‑apple‑pumpkin hybrid.
Coconut‑Lime Zest
Add 1/4 cup shredded unsweetened coconut and the zest of one lime to the batter. The tropical twist brightens the spice profile, making this version a surprising summer treat.
Protein Power
Mix in 1/4 cup vanilla vegan protein powder and increase the almond milk by 2 tablespoons. The loaf becomes a post‑workout snack that still feels indulgent, and the extra protein keeps you fuller longer.
Spiced Chai Infusion
Swap pumpkin pie spice for an equal amount of chai spice blend (cardamom, ginger, cloves, and black pepper). This gives the bread a warm, exotic flair that’s perfect for cozy evenings.
Storing and Bringing It Back to Life
Fridge Storage
Wrap the cooled loaf tightly in plastic wrap or store it in an airtight container. It will stay fresh for up to 5 days in the refrigerator. For a quick breakfast, slice and toast directly from the fridge; the toast will re‑crisp the crust while keeping the interior soft.
Freezer Friendly
Slice the loaf before freezing and place the slices in a zip‑top freezer bag, separating layers with parchment paper. The bread freezes solid for up to 3 months. To reheat, microwave a slice for 20‑30 seconds or pop a few slices into a toaster oven at 350°F for 5 minutes; the steam will revive the moisture.
Best Reheating Method
When reheating a whole piece, sprinkle a tiny splash of water over the surface, cover loosely with foil, and bake at 300°F for 10‑12 minutes. The added steam brings the crumb back to its original tenderness, as if it just left the oven.