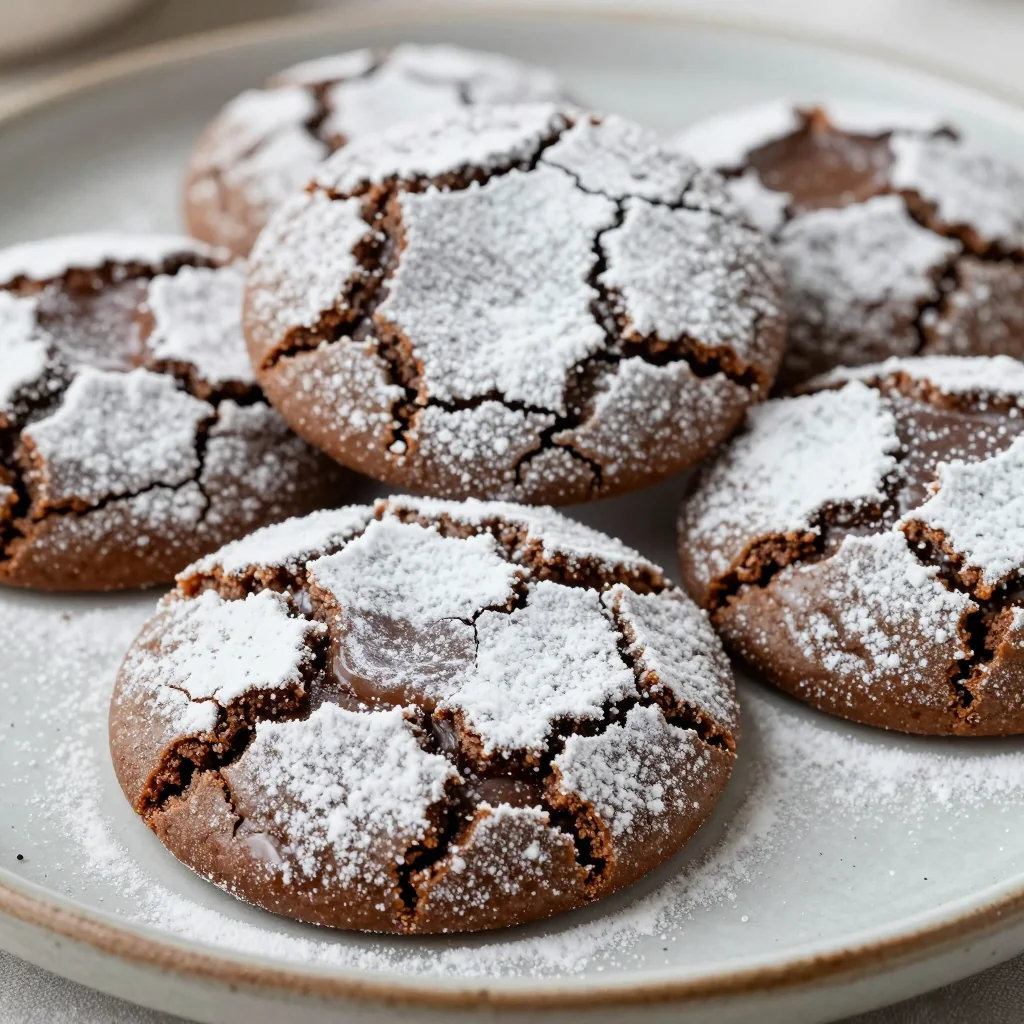
I still remember the day I ruined my grandmother's sacred brownie recipe so spectacularly that smoke alarms sang across the apartment building and my neighbors gathered in the hallway like I was staging some avant-garde performance art. In my defense, I was chasing the impossible: a brownie that married the fudgy density of the classic with the cloud-like whisper of chocolate mousse. Eight failed pans later, I stumbled on the secret—an almost-embarrassingly simple ratio tweak and a two-temperature bake that feels like kitchen wizardry. The result? Bars with a glossy, tissue-thin crust that shatters under your fork, giving way to an interior so silky it practically levitates from the pan.
Picture this: midnight in a tiny kitchen that smells like Willy Wonka's secret laboratory. Cocoa steam fogs the window, your favorite playlist hums low, and the oven light glows like a theater spotlight on the star of the show—my Chocolate Mousse Brownies. I dare you to taste one warm and not go back for seconds before it even cools. I'll be honest—when I finally nailed the formula, I ate half the batch standing up, leaning against the counter, swearing I'd wrap the rest for friends. Spoiler: those friends never saw a single square.
Most recipes get brownies completely wrong. They treat them like cake's heavier cousin, over-creaming the batter, adding chemical leaveners that puff them into dry bricks, or under-baking so the center turns into a gummy swamp. My version flips the script. We're using chilled eggs for structure, whipping the living daylights out of the sugar to create a glossy meringue shell, then under-stirring the flour like a gentle secret handshake. The payoff is a texture paradox: feather-light and impossibly rich at once.
Stay with me here—this is worth it. By the end of this post you'll know exactly when to pull the pan (hint: wobbly center equals velvet paradise), how to bloom cocoa for depth that rivals French pâtisserie, and why a 15-minute freeze before slicing gives you those Instagram-worthy clean edges. Ready for the game-changer? Let's do this.
What Makes This Version Stand Out
- Texture Sorcery: A crackly top born from whipped sugar and egg proteins, hiding a center that melts on your tongue faster than gelato in July.
- Chocolate on Chocolate: We use both bittersweet bar chocolate for complexity and Dutch cocoa for an intensely earthy backbone. It's a one-two punch that makes supermarket mixes taste like cardboard.
- One-Bowl Brilliance: Despite the fancy results, everything happens in a single saucepan and your stand-mixer bowl. Fewer dishes equals more time for licking spatulas.
- Make-Ahead Magic: These bars actually improve after a night in the fridge, turning even fudgier. Bake on Saturday, serve at Sunday dinner, look like a pastry-school grad.
- Freezer-Friendly: Double the batch, freeze half, and you have emergency dessert for surprise guests or those 11 p.m. cravings that strike during Netflix marathons.
- Crowd-Tested: I've served these at potlucks, birthdays, and a wedding where the caterer quietly asked for the recipe—true story.
Alright, let's break down exactly what goes into this masterpiece...
Inside the Ingredient List
The Flavor Base
Start with 70% bittersweet chocolate. Anything milder gets lost; anything darker bulldozes the delicate mousse layer. Chop it fine so it melts evenly into the butter, creating a glossy river you'll want to dive into. Dutch-process cocoa is non-negotiable—its lower acidity deepens color and rounds flavor edges. Skimp here and your bars will taste like sad supermarket cake.
The Texture Crew
Granulated sugar isn't just sweetener; it's a texture architect. When beaten with eggs it dissolves partially, then recrystallizes on top during baking to form that sexy wrinkly crust. Use superfine if you have it—it dissolves faster and gives a sheen so shiny you can see your reflection. Brown sugar adds chew, but only a smidgen; too much and the center collapses into sticky toffee.
The Unexpected Star
A single teaspoon of espresso powder is the culinary equivalent of Photoshop for chocolate. It doesn't make the brownies taste like coffee; it just cranks the chocolate volume up to eleven. If you skip it, no single bite will taste wrong, yet the overall experience feels flatter than a pop song without bass.
The Final Flourish
Use room-temperature butter for easy melting, but keep those eggs chilly. The contrast encourages gentle curdling that traps air, creating lift without chemical leaveners. A whisper of kosher salt sharpens every note, the way stage lights carve actors from the backdrop. Cornstarch is my sneaky addition—just a tablespoon replaces some flour for a more tender crumb that bends instead of breaks.
Everything's prepped? Good. Let's get into the real action...
The Method — Step by Step
- Position your rack in the lower third of the oven—this shields the top from scorching while the bottom sets. Preheat to 350°F (175°C) and line an 8-inch square pan with parchment, leaving wings to lift the slab later. Spritz lightly with neutral oil; any exposed bare metal can glue itself to your precious cargo.
- Melt butter in a medium saucepan over low heat. Once half liquefied, scatter in the chopped chocolate and swirl off heat. Let residual warmth finish the job so you don't scramble the eggs later. The mixture should look like midnight velvet and smell like childhood Halloween.
- While the chocolate party cools slightly, whip cold eggs and sugar in a stand mixer on medium-high for exactly 4 minutes. You're aiming for thick ribbons that mound when the whisk is lifted, then slowly dissolve back like falling lava. Under-whip and you'll lose the glossy top; over-whip and the batter collapses in the oven.
- Pour the warm chocolate river down the side of the mixer bowl to avoid deflating your airy eggs. Add vanilla and espresso powder, then spin on low just until the color homogenizes. Scrape the bowl once; streaks now become ugly swirls later.
- Combine flour, cocoa, cornstarch, and salt in a small bowl and whisk to break clumps. Sprinkle over the chocolate mixture all at once. Mix on the lowest speed for 8 seconds—yes, count it out loud. You should still see dusty patches. Finish folding with a spatula, scraping from bottom to top, rotating the bowl like you're tucking chocolate into bed.
- Spread batter into the prepared pan and rap it hard on the counter twice to pop hidden bubbles. Slide onto the lower rack and bake 22 minutes. The top will puff, crack, and look deceptively underdone in the center. That's your cue—anything more and you exit mousse territory, entering cake city.
- Cool completely in the pan set on a wire rack. Patience, my friend. The residual heat finishes baking while the structure sets. If you cut too soon, you'll have chocolate soup—delicious but messy. Once room temp, refrigerate 30 minutes for the cleanest slices.
- Lift the slab using parchment wings and transfer to a cutting board. Heat a long knife in hot water, wipe dry, then slice in one confident press. Clean the blade between cuts for bakery-display perfection. Serve cool for truffle-like density or room temp for that just-set softness that makes knees buckle.
That's it—you did it. But hold on, I've got a few more tricks that'll take this to another level...
Insider Tricks for Flawless Results
The Temperature Rule Nobody Follows
Your fridge-cold eggs should meet lukewarm chocolate, not scalding. Anything hotter cooks the yolks and you'll end up with chocolate scrambled eggs—delicious only if you're a very confused cat. Test by dabbing a drop on your wrist; it should feel like a warm baby's bottle, not a Jacuzzi.
Why Your Nose Knows Best
When the scent of hot cocoa drifts from the oven and the surface looks set but jiggles like gelatin, start the toothpick test. You want a few moist crumbs clinging, never wet batter. A clean toothpick means overdone; raw goo means you risk serving chocolate soup. Trust the aroma—it shifts from raw cocoa to bakery brownie exactly when it's time.
The 5-Minute Rest That Changes Everything
Once baked, cover the pan loosely with foil and walk away for exactly five minutes. Trapped steam loosens any stuck edges, saving you from the heartbreak of a cratered corner when you lift the slab. It's like a mini spa treatment that pays off in perfect slices.
Creative Twists and Variations
This recipe is a playground. Here are some of my favorite ways to switch things up:
Mocha Almond Fudge
Swap espresso powder for instant espresso and fold in ½ cup crushed chocolate-covered espresso beans plus ⅓ cup toasted slivered almonds. The crunch plays off the mousse layer like a jazz trio hitting the perfect note.
Spicy Mayan Brownies
Add ½ tsp cayenne and ½ tsp cinnamon to the dry mix. Dust cooled bars with a blend of cocoa and chili powder for heat that blooms after the chocolate melts on your tongue. It's the dessert equivalent of a slow-burn thriller.
Salted Caramel Swirl
Reserve ¼ cup batter. Dollop softened caramel sauce over the top, then zig-zag the reserved batter on top. Drag a toothpick through for marbling. Finish with flaky sea salt. The sweet-salty tug-of-war is addictive.
White Chocolate Raspberry
Omit espresso powder. Gently fold in ½ cup freeze-dried raspberries and ½ cup chopped white chocolate. The tart berries cut the richness while white chips create pockets of creamy contrast.
Peppermint Bark Edition
Replace vanilla with ½ tsp peppermint extract. Top the warm brownies with crushed candy canes and a drizzle of melted white chocolate. Chill until set for a holiday treat that tastes like December in every bite.
Triple Chocolate Overload
Add ½ cup dark chocolate chips to the finished batter plus ½ cup milk chocolate chunks pressed on top before baking. Three chocolates mean three times the therapy, and yes, you deserve it.
Storing and Bringing It Back to Life
Fridge Storage
Wrap individual squares in parchment, then tuck into an airtight container. They'll keep 5 days refrigerated without drying out. The flavor matures like a good stew—day three is peak harmony. Let them sit on the counter 20 minutes before serving unless you enjoy jaw workouts.
Freezer Friendly
Freeze slabs whole or pre-sliced. Wrap tightly in plastic, then foil, and stash inside a zip-top bag with the air sucked out. They'll hibernate up to 3 months. Thaw overnight in the fridge or 1 hour at room temp for sudden cravings.
Best Reheating Method
Microwave 10 seconds maximum for a just-baked gooey center. Any longer and you risk chocolate lava explosions. For a crowd, warm the whole pan covered with foil at 300°F for 8 minutes. Add a tiny splash of water to the pan before reheating—it steams back to perfection without drying edges.