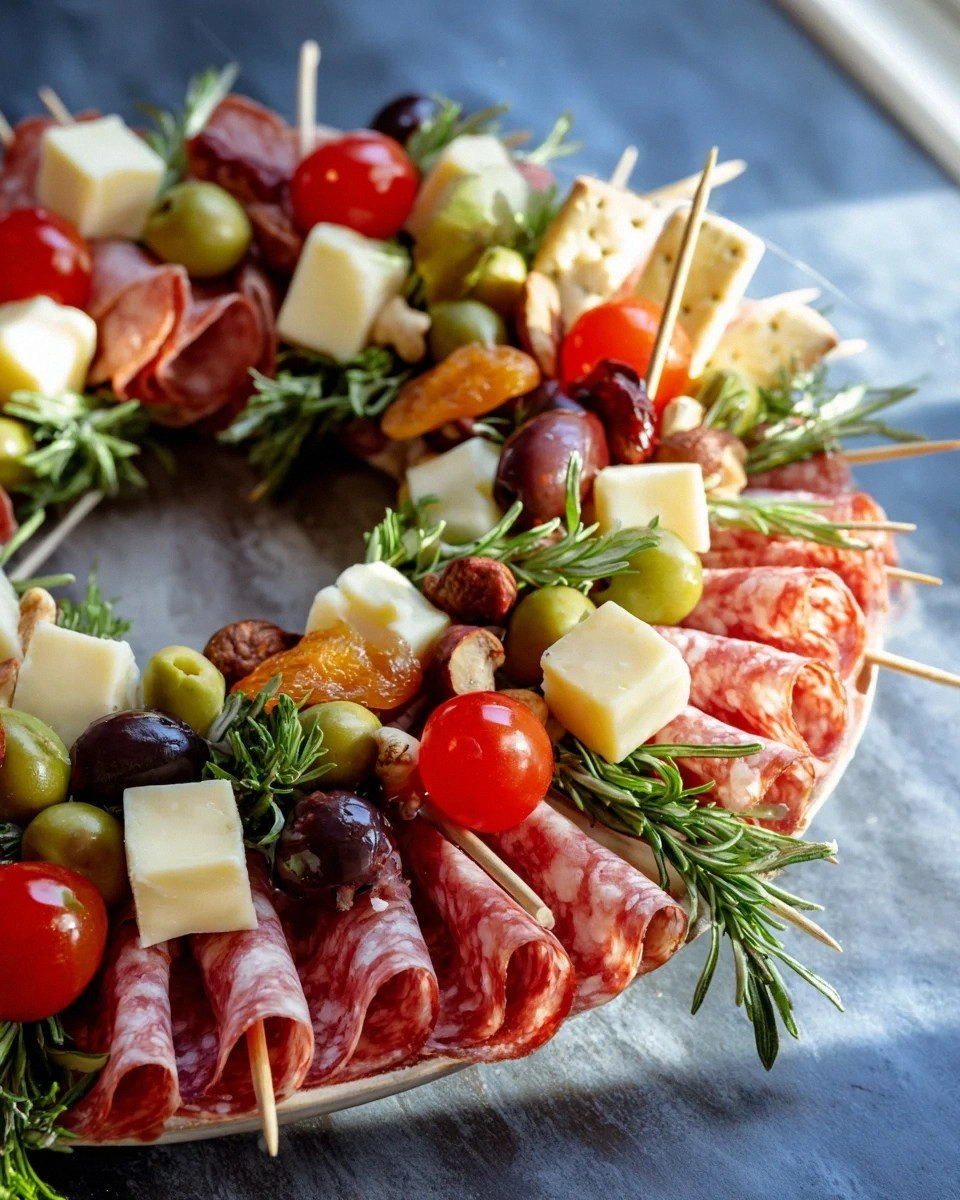
I still remember the first time I attempted to impress my future in-laws with what I thought would be a simple cheese board. Picture this: me, frantically arranging grocery-store cheddar on a cracked wooden cutting board at 6:47 PM, sweat dripping onto the pepperoni because the heat was cranked up to combat the December chill. My mother-in-law-to-be walked in, took one look at my sad, flat cheese situation, and politely asked if I needed help. Mortifying? Absolutely. But that kitchen disaster led to this magnificent Charcuterie Wreath — and I swear on my favorite cheese knife, this version will make you look like a culinary wizard even if you can barely open a wine bottle without injuring yourself.
Fast forward three years, and I've become the person friends text at 10 PM saying, "Emergency! Need to look fancy by tomorrow!" This wreath isn't just a pretty face — it's strategic, it's delicious, and it's designed for people who want maximum impact with minimum stress. The first time I unveiled it at a holiday party, the host literally stopped mid-sentence, gasped, and then demanded I teach her the technique before dessert. That sizzle of excitement when people realize you've brought something that looks like it belongs in a food magazine? Pure magic.
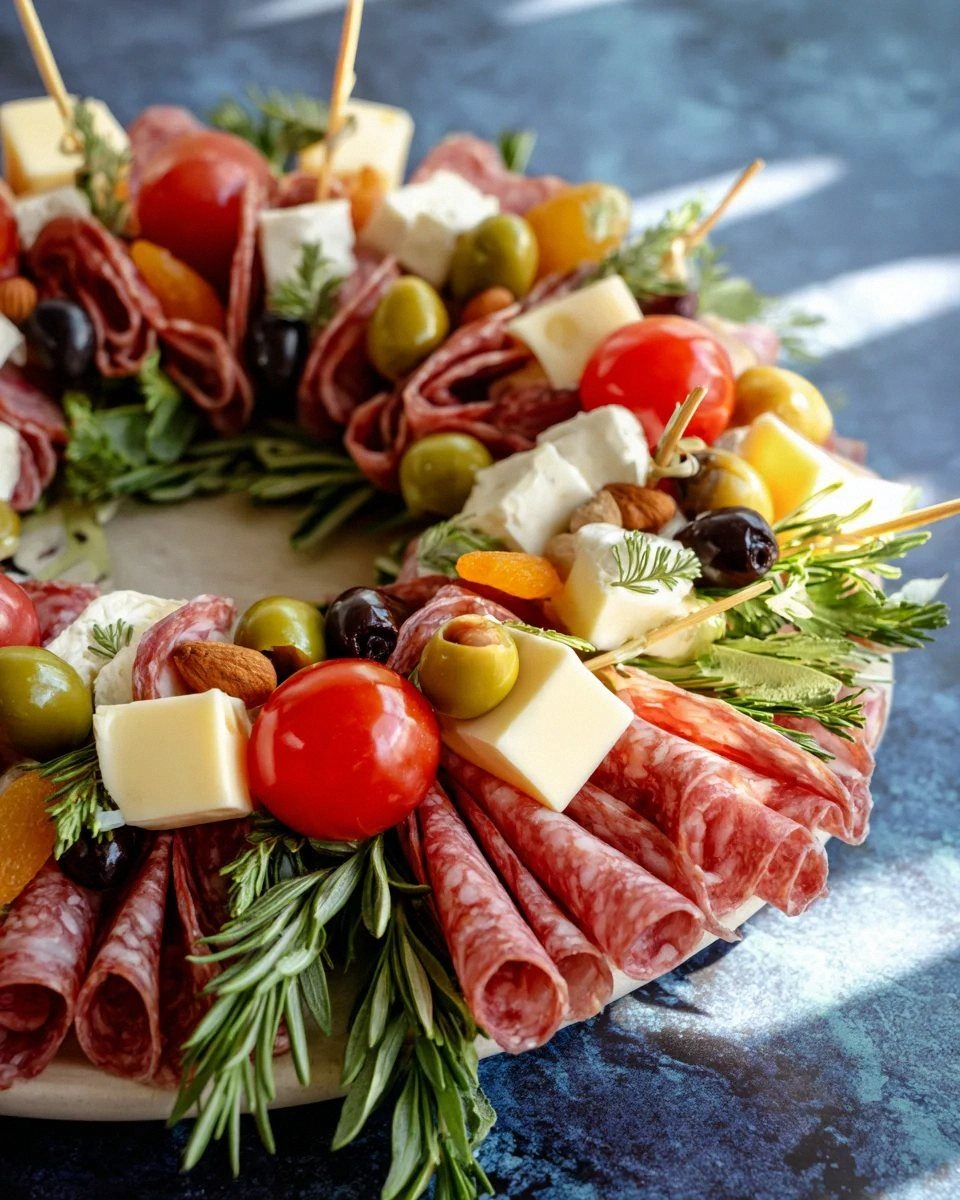
Here's the thing: most charcuterie boards are flat, predictable, and honestly? A little boring. They're like that reliable friend who always orders the same thing at restaurants. This wreath? It's the life of the party who convinces everyone to do karaoke at 2 AM. The circular design creates natural conversation points, the height variations make it Instagram-worthy from every angle, and the flavor combinations I've perfected will have people hovering around the table like vultures. I dare you to taste this and not go back for thirds — yes, thirds, because seconds happen before you can even grab your drink.
What makes this version different? We're building vertical, baby. We're thinking like architects, not just hungry people with cheese. The wreath form isn't just for looks — it creates pockets where flavors can mingle, where the honey can cozy up to the brie, where the grapes can nestle against the prosciutto like they're on a first date. Stay with me here — this is worth it. By the end of this, you'll wonder how you ever served a flat board again.
What Makes This Version Stand Out
This isn't your average slap-some-meat-on-a-plate situation. I've spent two years perfecting this technique, testing it on everyone from picky toddlers to food snobs who use words like "mouthfeel" unironically. The result? A show-stopping centerpiece that tastes even better than it looks — and it looks like it should be in a museum.
- Vertical Construction: Forget everything you know about flat boards. We're building up, not out, creating a three-dimensional experience that makes people involuntarily whisper "wow" when they see it. The wreath shape isn't just pretty — it's practical, allowing 360-degree access so no one's fighting for the good cheese.
- Flavor Gradient Design: Each section flows into the next like a perfectly curated playlist. Salty meets sweet, creamy meets crunchy, familiar meets adventurous. Your taste buds go on a journey instead of just standing in one spot.
- Make-Ahead Magic: Here's what nobody tells you: you can assemble 90% of this the night before. I discovered this by accident when I got distracted by a Netflix binge, and it was the best thing that ever happened to my party prep. The flavors actually improve as they get to know each other.
- Zero Waste Engineering: Every component serves multiple purposes. The rosemary isn't just decorative — it's edible and aromatic. The grapes aren't just filler — they're built-in palate cleansers. Even the board becomes part of the presentation.
- Conversation Starter Guarantee: This wreath breaks the ice better than a polar bear in a hot tub. People can't help but ask questions, make comments, and bond over their favorite discoveries. I've witnessed three friendships form over this board.
- Instagram Gold: In the age of social media, this wreath is pure visual catnip. The circular symmetry, the color gradients, the way the light hits different textures — your phone will run out of storage before you run out of angles to photograph.
- Scalable Sophistication: Whether you're feeding six people or thirty, the technique scales perfectly. I've made miniature versions for date night and massive ones for weddings using the exact same principles.
Alright, let's break down exactly what goes into this masterpiece...
Inside the Ingredient List
Before we dive in, let me confess something: the first time I made this, I spent $87 on ingredients and ended up with a wreath that looked like it had been through a windstorm. Quality matters, but strategy matters more. Here's how to build a wreath that'll make people think you studied at some fancy culinary school in France.
The Foundation Players
Think of these as your reliable best friends who always show up on time and bring good wine. Hard cheeses like aged cheddar and gouda form the structural backbone — they hold their shape when you cube them, creating those satisfying geometric patterns. I learned the hard way that soft cheeses make everything slump like a disappointed parent. The cured meats need to be foldable but not floppy; prosciutto should drape like silk while salami needs to hold a fold like origami paper. And please, for the love of all that is holy, don't use pre-sliced cheese. It tastes like plastic and has the personality of a tax form.
The Color Chorus
This is where we get artistic. Red grapes aren't just grapes — they're ruby jewels that catch light like stained glass. Green grapes? Emeralds that provide visual breathing room. Cherry tomatoes should be the size of your thumb tip — any bigger and they dominate like that one friend who won't stop talking about their CrossFit routine. The key is creating color stories: cluster your reds, cascade your oranges, let your greens create negative space. Most people just throw colors together like a toddler with finger paints. We're painting with intention here.
The Texture Troupe
If everything's creamy, your mouth gets bored faster than a teenager in math class. You need the snap of a breadstick, the give of a ripe brie, the crunch of an almond, the pop of a pomegranate seed. I always include at least three textures per bite zone — it's like choreographing a dance where every dancer has a different style but they all work together. The honey provides liquid gold threads that tie everything together, while whole grain mustard adds tiny pops of excitement like edible confetti.
The Secret Weapons
These are the ingredients that make people say, "I can't quite identify that flavor, but I love it." A few curls of dark chocolate tucked near the berries. Some candied ginger peeking out from behind the cheese. A drizzle of truffle honey that makes the whole thing smell like luxury. My secret weapon? A few sprigs of fresh thyme tucked throughout — when people lean in to grab something, they get this amazing herbal aroma that makes everything taste better. It's like aromatherapy, but you can eat it.
Everything's prepped? Good. Let's get into the real action...
The Method — Step by Step
Okay, ready for the game-changer? We're not just piling stuff on a board and hoping for the best. We're engineering an experience. Picture yourself pulling this out of the kitchen, the whole room going quiet as everyone processes what they're seeing. That moment? That's what we're building toward.
- Create Your Canvas: Start with a large round board — wood is traditional, but I've used everything from marble slabs to upside-down pizza pans in emergencies. Place a small bowl in the center; this is your anchor point and will eventually hold something glorious like honey or grainy mustard. Trace around a dinner plate about two inches from the bowl's edge — this invisible line is your wreath's inner boundary. Most people skip this step and end up with a sad, lopsided oval. Don't be most people.
- Build Your Base Layer: Begin with your largest items first. Cluster your grapes in groups of three or five — odd numbers are more visually appealing, it's science or magic or both. Create small mounds of olives, using them like edible punctuation marks throughout your design. The key is varying heights: some grapes sit directly on the board, others perch on top of cheese cubes like they're king of the castle. This isn't just pretty — it creates pockets where flavors can mingle.
- Cheese Architecture: Cube your hard cheeses into 3/4-inch pieces — big enough to grab without a fork, small enough to pop in your mouth. Start placing them in a pattern that alternates colors and textures: white cheddar next to yellow gouda next to marbled havarti. Build up, not just out — stack some cubes two or even three high to create visual interest. The cheese should look like a delicious city skyline, not a flat parking lot.
- Meat Origami: This is where things get artistic. Fold your salami into quarters and then roll them slightly — they should look like little rosebuds. Prosciutto gets the draped treatment: hold it up, find the natural folds, and let it fall like fabric. Soppressata can be rolled into cones that stand upright like tiny towers. The goal is making each piece look intentional, like it grew there. I once spent twenty minutes on one perfect prosciutto fold, and honestly? Worth it.
- The Bridge Builders: Now we connect everything. Breadsticks act as edible bridges between sections. Crackers get tucked in like supportive friends, filling gaps and providing textural contrast. This is also where you add your nuts — almonds, walnuts, or my favorite, candied pecans that provide sweet crunch bombs throughout the experience. Each addition should serve both visual and flavor purposes.
- Height Heroes: Time to think vertically. Stack some cheese cubes into small towers. Create meat roses that bloom upward. Use rosemary sprigs as green exclamation points throughout the design. The highest point should be no more than four inches tall — anything higher and people start worrying about stability. I learned this after a tragic incident involving a cheese tower and a very enthusiastic toddler.
- The Liquid Gold: Fill your center bowl with something spectacular. Honey is classic, but consider hot honey for a sweet-heat situation, or grainy mustard for a sophisticated bite. If you're feeling fancy (and who isn't?), make a quick balsamic reduction — it should coat the back of a spoon and taste like liquid velvet. This central element ties everything together and gives people a reason to keep returning to the wreath.
- Final Flourishes: This is where we go from good to "how did you even think of this?" Add a few pomegranate seeds for ruby-like sparkle. Tuck in some edible flowers if you're feeling extra. A light drizzle of honey over some of the cheese creates glossy highlights that catch the light. Step back every few minutes to assess — you're looking for balance, flow, and that indefinable quality that makes people want to dive in face-first.
That's it — you did it. But hold on, I've got a few more tricks that'll take this to another level...
Insider Tricks for Flawless Results
After making this wreath approximately forty-seven times (yes, I counted), I've discovered some secrets that separate the stunning from the merely adequate. These aren't just suggestions — they're the difference between people saying "nice cheese board" and them grabbing your arm mid-bite to ask if you cater.
The Temperature Rule Nobody Follows
Here's what separates the pros from the pretenders: temperature matters more than you think. Cheese should sit out for thirty minutes before serving — any less and the flavors stay locked up like shy teenagers at a dance. But here's the kicker: arrange everything while the cheese is still cold. Cold cheese holds its shape better, cubes cleaner, and won't slump under the weight of your artistic ambitions. Once it's arranged, let it come to room temperature. The flavors bloom, the textures soften, and suddenly that $8 block of cheddar tastes like it came from a Parisian fromagerie.
Why Your Nose Knows Best
Most people rely entirely on their eyes when building these wreaths. Big mistake. Your nose is like a flavor GPS, guiding you toward combinations that make sense. Smell your ingredients together before you place them. Does the prosciutto play nicely with the honey? Should the blue cheese be near the figs or would it overwhelm them? I once created what I thought was a visually perfect wreath that smelled like confusion and tasted like an identity crisis. Trust your nose — it evolved over millions of years specifically to keep you from eating things that don't work together.
The 5-Minute Rest That Changes Everything
After you finish assembling, walk away for five minutes. Seriously. Go wash your hands, pour yourself a drink, pretend you're a guest seeing this for the first time. When you return, you'll notice things you missed — a gap that needs filling, a color that's too dominant, a section that looks like it's trying too hard. This fresh perspective is like having a food stylist whisper in your ear. I once walked away and came back to realize I'd created a wreath that looked exactly like a face. Not the vibe I was going for at a sophisticated dinner party.
The Conversation Piece Placement
Every great wreath needs a conversation piece — something that makes people ask questions. Maybe it's an unusual cheese like a truffled gouda, or honeycomb still attached to the wax, or those ridiculously expensive Marcona almonds. Place it slightly off-center, not hidden but not obvious. It should be discovered, not advertised. My go-to is a small dish of saffron honey — people taste it, their eyes go wide, and suddenly everyone's sharing their most memorable food experiences. It's like edible therapy.
The Lighting Secret
Most people dramatically underestimate how much lighting affects their food presentation. A wreath that looks stunning under your kitchen's fluorescent might look flat and lifeless under dining room lighting. If you're hosting in the evening, set up a small lamp or candle near the wreath — the warm light makes the honey glow, the cheese glisten, and turns everything into edible jewelry. I learned this after spending three hours on a wreath that disappeared into shadows once the sun went down. Tragic doesn't begin to cover it.
Creative Twists and Variations
This recipe is a playground. Here are some of my favorite ways to switch things up:
The Breakfast Wreath
Who says wreaths are just for dinner? Swap the meats for smoked salmon, prosciutto-wrapped melon becomes bacon-wrapped dates, add mini bagel chips, cream cheese dollops, and tiny jars of jam. I served this at a brunch once and people literally applauded. The sweet-savory breakfast combinations work perfectly in wreath form, and the circular shape mirrors the morning sun symbolism. Add some mimosas on the side and you've got a brunch that'll be talked about until the next century.
The Dessert Wreath
Chocolate lovers, prepare to have your minds blown. Replace cheese with chocolate truffles, swap crackers for biscotti, use dried fruits like apricots and figs, add candied nuts, and fill the center with warm chocolate fondue. The construction technique is identical, but the result is a dessert board that looks like it belongs in a Swiss chocolate shop. I made this for a friend's birthday and she literally gasped when she saw it. Then she cried. Then we all cried. It was a whole thing.
The Mediterranean Version
Transport your taste buds to a Greek island with feta cubes, olives galore, sun-dried tomatoes, artichoke hearts, dolmas, pita chips, and tzatziki in the center. The colors are more dramatic — deep purples, bright whites, sun-baked reds — and the flavors are bright and herbaceous. I like to add some preserved lemons for that authentic Mediterranean punch. Warning: this version may cause spontaneous yodeling and urges to book flights to Santorini.
The Kid-Friendly Creation
Little hands need little bites. Use cheese cubes, rolled turkey slices, goldfish crackers, apple slices, grapes, and fill the center with ranch dressing or honey mustard. I made this for my nephew's birthday party and the kids attacked it like tiny, adorable piranhas. The best part? They were so excited about the presentation that they actually tried new foods. My sister still texts me photos of her son eating things he previously declared "yucky" because they were arranged in a wreath.
The Vegan Victory
Plant-based doesn't mean boring. Use marinated tofu cubes, roasted vegetables, hummus in the center, nut-based cheeses, olives, dried fruits, and plenty of fresh herbs. The key is using smoked or marinated elements to add that umami depth people usually get from meat. I brought this to a vegan potluck and even the carnivores were hovering around it. One guy asked for the recipe "for his vegan friend" but I saw him eating it directly from the serving plate later.
The Holiday Spectacular
Make it seasonal with dried cranberries, candied pecans, sage-dusted cheeses, and maybe some edible gold leaf for extra festivity. The wreath shape already screams holiday, but add some cinnamon sticks, star anise, and sugared rosemary, and suddenly it's Christmas in edible form. I made this for a holiday party where everyone was supposed to bring a dish, but people just stood around the wreath all night. The host still mentions it every December like it's a cherished memory.
Storing and Bringing It Back to Life
Contrary to popular belief, you don't have to demolish the entire wreath in one sitting (though I won't judge if you do). Here's how to handle leftovers like a pro:
Fridge Storage
Remove any perishable items like meats and soft cheeses within two hours of serving. Store them in airtight containers — meats wrapped in parchment paper, cheeses in wax paper then plastic wrap. Hard cheeses and grapes can stay on the board if covered with plastic wrap. The key is keeping moisture away from crackers and bread. I learned this the hard way after discovering what I can only describe as "cracker pudding" in my fridge. Not pleasant. Properly stored, most components last 3-4 days, though the presentation obviously won't be wreath-worthy after disassembly.
Freezer Friendly
Some components freeze beautifully, others turn into science experiments. Hard cheeses freeze well — wrap them tightly and they'll keep for two months. Most cured meats can be frozen, though the texture might change slightly. Fruits and vegetables? Forget about it. They emerge from the freezer like sad, mushy ghosts of their former selves. Breadsticks and crackers should never see the inside of a freezer unless you enjoy the taste of freezer burn and disappointment.
Best Reheating Method
Here's a revelation: most of this doesn't need reheating. Cheese just needs to come to room temperature for maximum flavor impact. Meats can be gently warmed in a low oven (275°F) for 5-7 minutes, wrapped in foil to prevent drying out. The real trick is reviving crackers and bread — pop them in a 300°F oven for 5 minutes and they'll crisp right back up. Add a tiny splash of water to your cheese before bringing it to room temperature — it steams back to life, regaining that just-cut creaminess. I discovered this after my cheese budget was slashed during grad school, and honestly, it was a game-changer.